Restricting usage of NEOSYS to licence period
Restricting usage of NEOSYS to licence period
- A NEOSYS software licence key is granted depending on the last paid up invoice licence period plus optional grace days.
- The NEOSYS software prevents, after the grace period, creation of new documents not dated within the licence period.
- The NEOSYS software does not at any time place any limitation whatsoever on the use of documents already created in the system or the creation of new documents dated within the licence period.
- The intention of NEOSYS licence expiry is to allow the user to continue using the NEOSYS system normally for documents that apply to valid licence periods while at the same time, after a grace period after the expiry of the licence, to prevent them from entering new documents that are related to periods outside the valid licence periods.
- Once a licence has been entered in a database, then usage of that database is thereafter subject to licensing restrictions.
(Currently there are no usage restrictions prior to entering any licence, however this may change in later versions of the NEOSYS software and no database may be used without valid licensing in place)
Example:
The last paid up invoice for software support and licence covered a licence period of one month from 1 Oct 2009 to 31 Oct 2009.
A licence key has been installed in the database for the same period and with a grace period of 7 days.
Up to 7th Nov 2009 users can create documents without restriction.
From the 8th Nov 2009 onwards:
- Users can view and amend any document already created
- Users can create documents dated up to 31 Oct 2009
- Users *cannot* create any new document dated 1st Nov 2009 or later
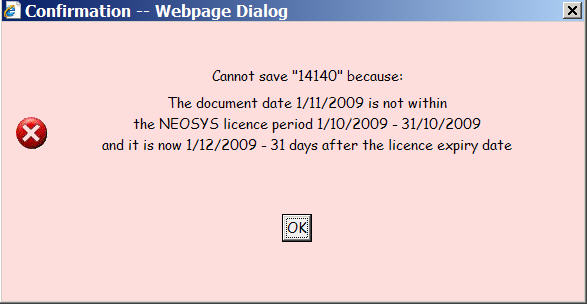
When a user tries to save a new document that
- does not fall within a valid licence period and
- the current date is more than the number of grace days after the licence expiry date
the user will get the following message:
Entering NEOSYS licensing information
If adding multiple licences to a database that currently has no licence restrictions, be careful to add any current licences first and historical licences last, so that any active users working on current periods do not get locked out , however briefly.
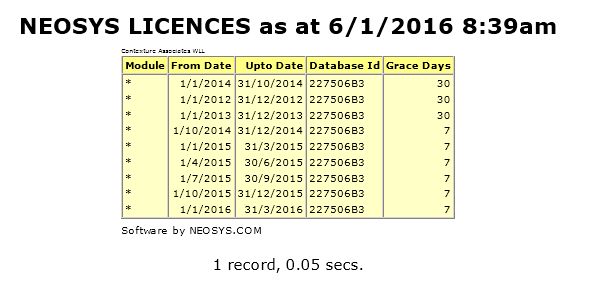
To view the licences already entered in the database
On exodus screen 6,
./run <dbname>
x
chklic
For AREV, enter CHKLIC in maintenance mode
The list of licences is generated as shown below
Step 1 – Generate “licencetext”
Depending on what licence you want to grant, enter the following command. It will show a line of “licencetext” including the computerid and databaseid.
Exodus:
./run <dbname>
x
addlic modulenames fromdate uptodate daygrace
AREV:
ADDLIC modulenames fromdate uptodate daygrace
All parameters are required and must appear in the order shown.
Generally support should just renew the licence similar to the previous licence unless otherwise instructed. All the required parameters (i.e. modulenames, licence period and days grace) are available in the list of licences report (CHKLIC) mentioned in the previous section.
If the prior licence allows more than 7 days grace, then the days grace for the new licence MUST be determined by NEOSYS accounts team (or whoever asked for the licence to be added).
If there are no prior licences, then the module names, licence period and days grace MUST all be decided by NEOSYS accounts team (or whoever asked for the licence to be added).
modulenames can be any combination of the following, separated by commas with NO spaces, or a single * to allow all modules.
- MEDIA
- JOBS
- FINANCE
- TIMESHEETS
daygrace is how many days after the licence expiry before NEOSYS starts restricting creation of new documents to dates within the licence period.
Example:
addlic * 1/4/2021 30/6/2021 7
The output for the above code appears as shown below:
PLEASE GIVE THE FOLLOWING TEXT TO YOUR EXODUS SUPPORT STAFF
"* 1/4/2021 30/6/2021 7 234200 29C7B98A"
What is the verification code?
Step 2 – Generate verification code
- Remove the spaces in the license text returned by addlic.
- ./run <dbname>
- x
- secid <string from step 1> <security code>
Contact support manager for the security code
Example:
secid *1/1/201731/12/2021723420029C7B98A <security code>
Step 3 – Do addlic and enter the verification code
Either enter the same command as in step 1 and enter the code when prompted, or enter the following command. The format of the command is almost identical to step 1 but adds computerid databaseid licencecode.
addlic modulenames fromdate uptodate daysgrace computerid databaseid verificationcode
Example:
addlic * 1/4/2021 30/6/2021 7 234200 29C7B98A 654321
Step 4 – Verify that the licence has been added successfully
Email should be received with details of the newly added licence restriction.
Run chklic again to generate the list of existing licences and verify that the new licence information has been added to this list.
Removing NEOSYS Licences
If it is no longer required to restrict usage of NEOSYS to a licence period for a database, then delete the licence from that database. All licences installed in a database get removed/deleted once the below commands are followed.
Step 1 - Generate the licence deletion text
Exodus
./run <dbname>
x
dellic
Arev:
In maintenance mode, enter the following command
DELLIC
In some versions of NEOSYS, the DELLIC command will remove licenses without prompting for a verification code.
Select Yes.
/root/hosts/empire/work Command? dellic
Begin transaction
========================================
Delete all EXODUS Licences?
 1. Yes
*2. No
 Please enter 1 - 2 or Enter to default or 0 to cancel.
1
Output:
PLEASE GIVE THE FOLLOWING TEXT TO YOUR EXODUS SUPPORT STAFF
"DELLIC 589801 27E86CFB"
What is the verification code?
Step 2 - Generate verification code
- Remove the spaces in the license text returned by dellic.
- ./run <dbname>
- x
- secid <string from step 1> <security code>
Contact support manager for the security code
Example:
secid dellic23420029C7B98A <security code>
Step 3 - Enter the verification code
Either enter the same command as in step 1 and enter the verification code when prompted, or enter the following command in maintenance mode
dellic verificationcode
Example
dellic 915036
Step 4 - Verify that all licences have been removed successfully
Run chklic in maintenance mode to generate the list of existing licences. The NEOSYS licences report should show "No records found".

