Installing NEOSYS Service
INSTALLING NEOSYS SERVICE
Reference to X:\ in the notes below denotes the actual drive letter and needs to be replaced (eg D:\)
Main installation:
Make sure NOT TO COPY an existing NEOSYS installation to another location and ONLY do a
completely new install with a fresh database, because copying a folder will copy a variety of
hidden configurations.
Installing NEOSYS on partitions
Good server management practice is to have separate partitions for operating system (C:) and data partitions (D:)
In the case of operating system reinstallation (which causes the loss of the C: partition) if NEOSYS programs and data were installed on D: can be preserved. If there is only one partition then NEOSYS programs and data will have to be backed up and restored.
Multiple Partitions
NEOSYS should be installed on a different partition rather than the C drive for reasons already explained above (eg. D drive)
Single Partition
If there is only one partition then you have to inform the client to take the effort to reinstall the operating system or using third party repartitioning tools to create separate partitions.
Downloading and running installation files
- http://www.neosys.com/support/neosys.exe ... and unzip/install to X:\neosys (or to X:\hosts\clientcd for multi-installation on one server)
- http://www.neosys.com/support/neosys2.exe ... and install same as previous step.
Creating shortcuts
In x:\neosys (or x:\hosts\clientcd), make a shortcut called ‘Maintenance’ and link it to
x:\neosys\neosys\adagency.bat (for Adagency install)
or
x:\neosys\neosys\accounts.bat (for Accounts install)
Activating NEOSYS using authorization number
Start NEOSYS Maintenance, select Initial Backup and it will give a “Computer Number” and ask for an “Authorisation No”
Send the computer number to NEOSYS admin to get the authorization no.
If you cannot get the authorization number immediately then you can close NEOSYS and when you reopen NEOSYS it will still give the same computer number and accept the same authorization number.
Installing initial Database
Download the initial database file from http://www.neosys.com/support/BACKUP.ZIP and place it in D drive (or any other drive) - but make sure that this file exists in the root folder i.e. D:\BACKUP.ZIP
Follow the steps below:
- Click on the Maintenance icon.
- Select BASIC DATA SET and type in the NEOSYS username and password. (If the system does not prompt for a username and password,then go to Quit > Quit to next user and type the same in. If you do not enter with a username and password then NEOSYS will not allow you to restore the database). The first time when you enter maintenance you will get a command box (like when you do F5). If you do not get a command box, hit the F5 key and get it on the screen and hit ESC after you get it.
- Now restore the BACKUP.ZIP (STARTUP DATABASE), to do so go to General > Backup & Data Management, select (the 4th option) Restore from disk or diskette. select D drive (or whichever drive you put the backup.zip file in) and follow the prompts ahead.
- On every successful restore or creation of dataset, system will give you a message to swithh to new database always say NO to this,because the switch to database option brings you back to the BASIC DATA SET. Hence press the ESC button, type EXIT on the F5 prompt.
- Now startup maintenance again and you will find a new database "STARTUP DATABASE" select it and login with NEOSYS username and password. Once you enter you may find a prompt "TASK ADDED" follow the prompt and continue.
- After you have logged in, go to General > Backup & Data Management > Delete a dataset and select the "BASIC DATASET" to delete, to confirm the delete system will ask you to enter the dataset code. Enter the code and delete the basis dataset.
- Now create a new dataset for the client, go to general > Backup & Data management> Create a new dataset, select (6th option) and follow the instruction on how to setup database code from the following link "http://techwiki.neosys.com/index.php/Installing_NEOSYS_Service#Assigning_database_codes"
- Once the client dataset is created,login to the clientdataset and follow the steps in above point6 and delete the STARTUP DATABASE. (while logging in to the client dataset, it ask " This database hsa been copied or the database name or code has been changed. Is this going to be a unique new master database?" select first option YES - Going to be a new independent database.
- To check the list of dataset on the computer, go to go to General > Backup & Data Management > See a list of dataset in the computer(8th option).
Note:
- Sometimes it may tell you that you cannot use FILEMAN as you are logged in as MASTER. Hence you need to hit the ESC key, go to General > Backup & Data Management > Restore from disk or diskette, select C drive or whichever drive you put the backup.zip file in and follow the prompts ahead.
- While doing the step no.2 if you get a message as below just hit enter or space and continue.
╔════════════════════════════╗
║      NEOSYS SECURITY       ║
║    What is your name ?     ║
║                            ║
║   [                    ]   ║
║                            ║
║  Please enter your name,   ║
║   or press Esc to exit.    ║
╚════════════════════════════╝
Assigning database codes
It is necessary to make sure that the following guidelines are met while creating database codes:
- The code should be within 8 letters
- The client should be as recognisable as possible from the main database code
- The test database code should end with the TEST word and it is not necessary that it must be recognisable
- The test database code should always appear after the main database code at login
Examples of wrong and right database codes:
ALTO VISTA ADVERTISING
ALTOVIST and XALTTEST - right      AVISTA and AVTEST - wrong   (AVISTA not "as recognisable as possible")

CONTEXTURE ASSOCIATES
CONTEXT and XCONTEST - right       CONTEXT and CONTEST - wrong (CONTEST alphabetically first in the login screen database drop down)
Creating a .CMD file to start NEOSYS Service:
(Note: change x to the correct drive you have installed NEOSYS on)
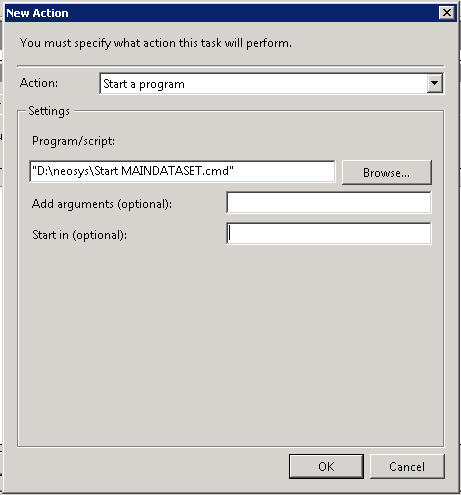
In x:\neosys create a file start MAIN-DATABASE-CODE.cmd (eg start ALTOVIST.cmd)
x:
cd \neosys\neosys
Start neosys.js /system ADAGENCY /database databasecode
(where databasecode is the code of the database) (also you need to replace ADAGENCY with ACCOUNTS if this is an accounts only installation)
In x:\neosys create a file start TEST-DATABASE-CODE.cmd (eg start AVTEST.cmd)
x:
cd \neosys\neosys
Start neosys.js /system ADAGENCY /database testdatabasecode
(where testdatabasecode is the code of the testdatabase) (also you need to replace ADAGENCY with ACCOUNTS if this is an accounts only installation)
TEST THAT THE FILES YOU HAVE CREATED CAN RUN SUCCESSFULLY
ENSURE THAT YOU DO NOT CLOSE THE PROCESS WINDOWS BY USING THE X BUTTON. HIT ESC 3 TIMES ON EACH WINDOW.
Differences for Pure Accounts Module Only Installations
Accounts module only has a slightly different startup command. In the above, replace /system adagency with /system accounts to startup a service and use accounts.bat instead of adagency.bat to start up maintenance. Other than that, accounts module setup is identical. Pure accounts clients are very few and tend not to upgrade often so care needs to be taken when upgrading. Upgrade is perhaps surprisingly done using the adagency.exe file.
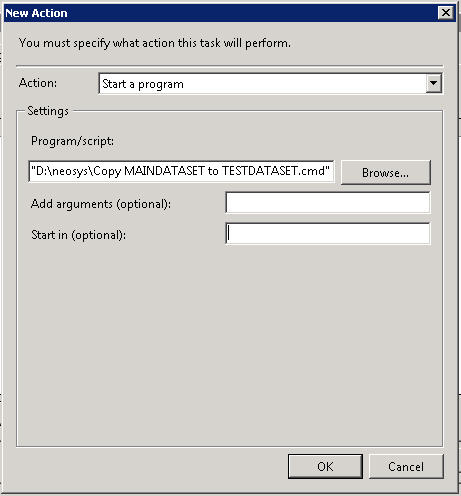
Creating a .CMD file to copy maindata to testdata
In x:\neosys create a file copy MAINDATABASECODE to TESTDABASECODE.cmd
xcopy x:\neosys\data\maindatabasecode x:\neosys\data\testdatabasecode /s /y
eg. xcopy c:\neosys\data\ALTOVIST x:\neosys\data\AVTEST /s /y
Run this file to test that it works fine.
Setting up daily scheduled tasks
Automatic Schedules: NEOSYS automatically shuts down at 1am (was 2am) every morning for backup. It closes all the running processes and backups up to the selected drive.
Manually Configured Schedules: to be done under Scheduled Tasks
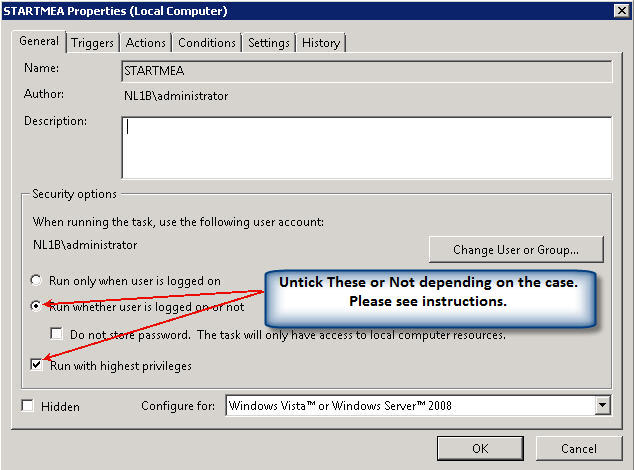
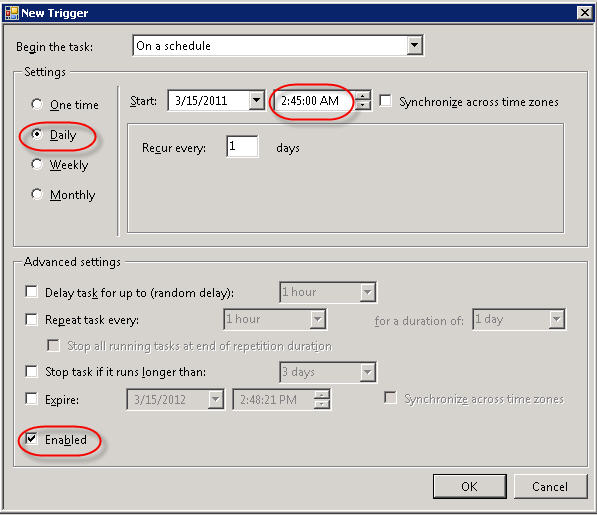
Note: Under Windows 2008 Standard you need to UNTICK highest privileges and UNTICK run whether user is logged in or not as shown in the screen shots that follow:
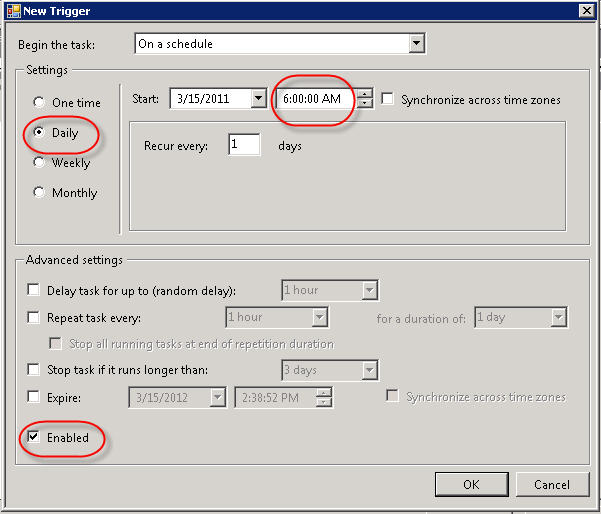
1. Create a task to start one Main database process at 6:00 am daily.
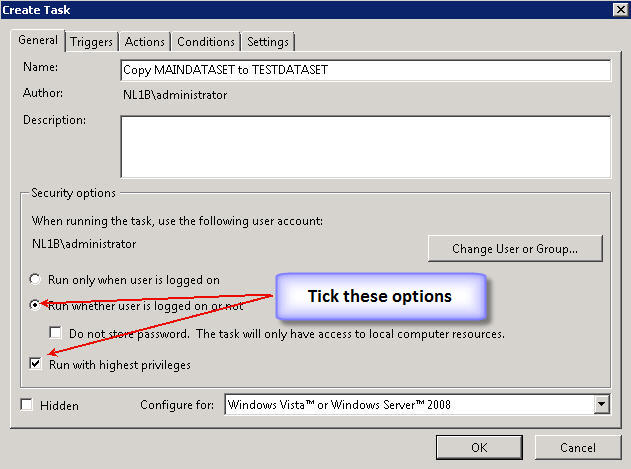
2. Create a second task to Copy Maindata to Testdata at 2:45 am daily.
(For multiple sites on the same computer put the second site starting five minutes later at 6:05am, third site starting five minutes earlier at 5:55am, the third site starting five minutes later at 6:10am and so on.)
Once created, test them to see that they are working correctly by running them directly using right click- Run.
(Use web access and go to Support Menu, System Configuration File to request 3 processes for main database and 1 for test database).
Please note that test running “copy test data” should be avoided while users are online but there is no problem testing the “daily 6am startup task” at any time since it will just add an additional process.
Configuring NEOSYS to start automatically on server start-up / reboot
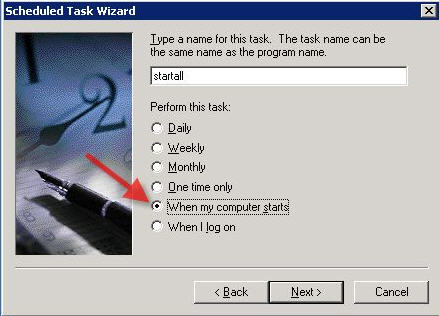
We no longer configure NEOSYS processes to start on reboot as we would like to know of the failures at the client side and hence whenever the server reboots we expect the client to inform us and we will start the process - or NEOSYS will start automatically next day at 6 am
Unfortunately using this method the NEOSYS processes are not visible when you login as a user.
Schedule a task to run the main database file whenever the computer starts. In Windows 2008 you need to tick the options - Run whether user logged in or not and Run with highest privilege.
Additional in Windows 2008: Tick Highest Priviledges and Run whether user logged in or not
Installing and upgrading NEOSYS pure accounting systems
Basic installation using NEOSYS.EXE and upgrades using NEOSYS2.EXE are identical to the normal adagency installation process.
Differences are as follows:
- Maintenance shortcut to ACCOUNTS.BAT
- Process startup file contains "/system ACCOUNTS" instead of "/system ADAGENCY"
- Internet address is http://server/neosys/accounts.htm although it auto converts to http://server/neosys/default.htm??ACCOUNTS. Although not to be relied upon, the login page stores a cookie so even plain http://server/neosys or http://server/neosys/default.htm works thereafter until the cookie is lost. To get back to adagency login you use http://server/neosys/default.htm??ADAGENCY
- BACKUP.ZIP files created by ADAGENCY systems and ACCOUNTS systems are slightly incompatible with the result that restoring one in the other type of system will not work. NEOSYS programmers can convert from one type to the other but it is almost never required since any ad agency that only requires accounts only module is given the adagency version of NEOSYS and accounting only clients becoming ad agencies never happened.

