Setting up and using remote support
Getting agreement of client IT staff to provide remote support
Letter to obtain agreement of client IT staff to provide remote support
Installing and configuring the server
Installing and configuring SSH
Installing Cygwin with OPENSSH
Watch out for non-intuitive steps like clicking "skip" to install something.
- Read Avoiding Corrupt Cygwin Installations
- ENSURE that you are logged in as the local (NOT DOMAIN) administrator
- Run http://www.cygwin.com/setup.exe
- Install from Internet
- Root Directory: c:\cygwin
- Local Package Directory: c:\cygwin.lib
- Direct Connection
- Download Site: http://mirrors.kernel.org (near the bottom)
- Select Packages: Maximise window then click View once to get Full
- Next to the package OPENSSH, click the word Skip (once!) to get version 4.4p1-1 or later
- Next to the package NANO, click the word Skip (once!) to get the latest version available
- Next to the package WGET, click the word Skip (once!) to get the latest version available
- Next to the package RSYNC, click the word Skip (once!) to get the latest version available
- Next to the package DIFFUTILS, click the word Skip (once!) to get the latest version available (required by ssh-host-config)
- Check the NEOSYS INSTALLATION CHECKLIST for any other packages to install like the above.
- Click Next and complete the installation
Configuring and starting SSHD
Open the Cygwin icon to get a linux/bash command line and type:
Make some changes apparently required by the next step ssh-host-config
chmod +r /etc/passwd
chmod +r /etc/group
chmod 777 /var
Thereafter start with the ssh configuration:
ssh-host-config
Then on the following options type:
Privilege – 	YES
Simp create –	YES
Sshd – 	YES
Sshd Server – 	NO (as it asks you whether you want to use another account)
Pass – 	Create a random password as copy/paste it twice to reconfirm
At the command prompt type
net start sshd
Troubleshooting SSH: If SSH connects and then disconnects immediately without exchanging keys
The first time that NEOSYS runs, it automatically adds source ip number restrictions to the sshd remote support configuration in /etc/hosts.allow and /etc/hosts.deny. This is an important security procedure to allow connection to clients systems from NEOSYS ip numbers only. This process allows only local and known NEOSYS ip numbers to connect using SSH. Upgrading NEOSYS will add and/or remove allowable ip numbers as NEOSYS configuration changes.
It is possible that in some client network configurations incoming ssh connections will appear to be from the clients internal routers with an ip unknown to NEOSYS due to NAT configurations. Therefore ssh connections will be blocked unless specifically allow the local ip number or it is added into an upgraded version of NEOSYS.
NOTE: Therefore you must check that remote support via ssh works AFTER you have run NEOSYS once (maintenance mode).
- Look in the Windows, Computer Management, System Tools, Event Viewer, Application
- Search for entries from source "sshd", double click and look in the Event Properties, Description for ip numbers
- Information type sshd entries will give the ip number of successful sshd connections.
- Warning type sshd entries will give the ip number of failed sshd connections.
- Find the ip number of failed connections.
Possible Problem 1 - Port mapping in router is using NAT
If the ip number of failed connections is some local ip number (of the router for example) then possibly the inbound port forwarding has been done with NAT and the source ip number has been lost. Therefore the NEOSYS ip restrictions are blocking ssh connections because they appear to be coming from an unknown ip number (ie that of the router)
Solution 1A
Change the router configuration to not use NAT and leave the genuine original source IP number
Solution 1B
DO NOT USE THIS PROCEDURE TO BREAK NEOSYS SECURITY
DO NOT GRANT ACCESS TO ANY IP OTHER THAN CLIENTS ROUTER IPS
Add the routers IP number to the list of authorised ip numbers in the cygwin hosts.allow file as follows:
nano /etc/hosts.allow
and add the line as follows ... but put the ip number of your router
sshd: allow 192.168.0.99
- router - sadly using NAT instead of plain old port forwarding
- if the router ip changes then neosys remote support will fail until this line is changed
- NB do not grant access to 192.168.* etc since this allows local LAN viruses to attack
Trouble shooting sshd
You can run the sshd service interactively to see all messages instead of having to search logs/events etc.
Unfortunately this will not work the same as the normal windows sshd service unless you assume the identity of the sshd_server user. To assume the identity of the sshd_server user you will have to reset its password to something new (since we dont take a record of it during sshd-host-setup) AND ALSO place the new password in the logon properties of the sshd windows service.
su sshd_server
/usr/sbin/sshd -D -p 19580
Reinstalling SSHD if service fails to startup
- Look in /var/log/sshd.log for errors
- Delete the following users: sshd and sshd_server
- Remove the sshd service at the cygwin prompt type cygrunsrv –R sshd
- Do the above Configuration and starting SSHD step again
Note that you don't have to reinstall cygwin entirely, just sshd with the above steps.
Upgrading SSHD / Cygwin
- Read Avoiding Corrupt Cygwin Installations
- Connect normally using ssh/remote desktop etc.
- Establish another non-ssh vnc reverse connection
- Schedule an hourly reverse connect of vnc in case you lose the connection. Add the following to scheduled tasks - "C:\Program Files\UltraVNC\winvnc.exe" -connect address.ofneosys.supportstaff::port
- Make sure you have disconnected the ssh/remote desktop connection at this stage after you have established a reverse connection (i.e. if using Tunnelier, make sure that ssh connection using Tunnelier is not still open and not minimised in the notification area of the taskbar)
- net stop sshd
- Delete any bash/rsync and other cygwin related processes in task manager. You can type ps -ef in a cygwin bash console to find out their names.
- Ensure that you can rename c:\cygwin\bin\cygwin1.dll to xxx and rename back to ensure that no cygwin processes are running. Unfortunately not a perfect guarantee.
- Upgrade cygwin using the same general steps as a normal cygwin install. If any files cannot be upgraded do your best to kill the offending process and retry. Otherwise you may end up having to uninstall/reinstall cygwin from scratch.
- net start sshd
How to uninstall/reinstall cygwin
With setup.exe (the installer file of cygwin) you can uninstall individual packages but not Cygwin.
Before you do this, make sure you have stopped the cygwin service (NET STOP SSHD), removed the sshd server (cygrunsrv -R sshd), deleted the users (sshd & sshd_server).
To uninstall Cygwin you have to run the following in DOS prompt:
rmdir /s /q C:\cygwin
You cannot delete the cygwin folder from Windows explorer due to a Access Denied error and this is the best way to uninstall cygwin.
Getting Ownership and Permissions Correct
Installation of cygrin under domain administrator account needs to be fixed as follows:
- c:\cygin Properties, Security, Advanced
- Change owner to: Administrators
- Tick: Replace owner on subcontainers
After changing ownership of all cygwin folders to Administrators all ssh login will be blocked and you will get a windows application event log message. "root" actually means sshd's user which is sshd_server by default or can be found in the cygwin ssh windows services properties under log on
fatal: /var/empty must be owned by root and not group or world-writable.
Fix this in cygwin console as follows:
chown sshd_server /var/empty
Configuring Firewall/Router
You will have to port forward 19580 on the router to port 22 on the neosys server.
Some routers don’t support changing ports so you have to forward port 19580 → port 19580 and use configure SSHD to listen on port 19580 instead of port 22. Instructions for this follow. It is BAD idea to simply open port 22 since an open port 22 attracts scanners/hackers like flies.
Some routers call port forwarding “port mapping” or “virtual servers”
Also configure port forwarding of port 4430 to port 443 or if not possible then port 4430 to port 4430 on server. This is for remote access via https if desired at a later date.
Configuring Specific Client Routers
Adline Dubai - CISCO PIX Firewall
Alto Vista - SonicWALL Firewall
Configuring SSHD to use a non-standard port number
This is necessary if the router cannot forward port 19580 --> 22 and we don’t want to open port 22 directly.
Capitalization is signification in cygwin/linux commands
open cygwin command prompt
cd /etc
chown administrator sshd_config
nano sshd_config (assuming that you have installed the NANO editor)
notepad sshd_config (incase you havent installed the NANO editor)
ctrl+W search for port 22. change 22 to 19580. ctrl+x to save
chown system sshd_config
net stop sshd
net start sshd
How to install ssh on port 19580 over vnc on port 19580
Install vnc on port 19580
connect on vnc
setup cygwin sshd on port 22
test you can login on port 22
ssh neosys@127.0.0.1
change sshd port to 19580 (but it wont start)
schedule a windows system reboot in 10 mins at windows command prompt
shutdown -t 600
change vnc port to 5900 (if will disconnect you)
wait for 10 mins and try to ssh login on port 19580
Error while changing Cygwin port 22 to 19580
Error Message: Could not open file for writring: permission denied
Occurence: Sometimes When you edit the sshd_config file through NANO.
Solution: In SSH shell, follow these commands:
cp sshd_config ashwin_temp (copies sshd_config to a new file ashwin_temp)
rm sshd_config (deletes sshd_config)
cp ashwin_temp sshd_config  (copies ashwin_temp to sshd_config)
Incase it does not copy sshd_config to ashwin_temp, than check whether an ashwin_temp filename exists and delete it using the rm command.
Changing user on Cygwin
On SSH command line:
ssh neosys@127.0.0.1 (where 'neosys' is the username)
Installing and configuring UltraVNC
Download UltraVNC from http://www.ultravnc.com
Run installation – all default options EXCEPT choose INSTALL AS A SERVICE, and START SERVICE.
((screenshot required))
Run ‘Service Helper’ under UltraVNC Server in case you don’t see vnc tray icon on the notification area.
Admin options should make the following changes:
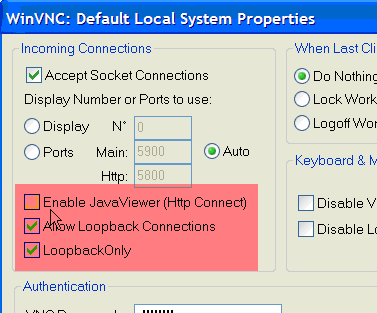
- Deselect – Enable Java (to increase security)
- Select – Allow loopback connection (essential for connection via ssh)
- Select - Loopback only (to increase security)
Installing and configuring the client
It is advisabke to use http over ssh rather than remote access IE inside vnc because the user interface is much faster alhough it might not be so bad using vnc to hosts in the same country
Installing Putty
http://the.earth.li/~sgtatham/putty/latest/x86/putty.exe
Download putty.exe > run
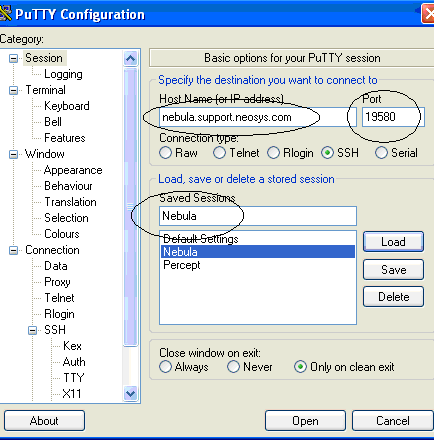
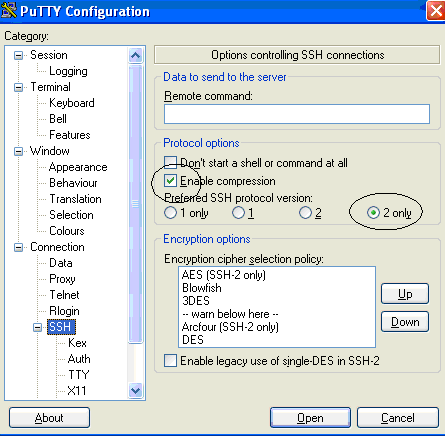
Configuring Putty
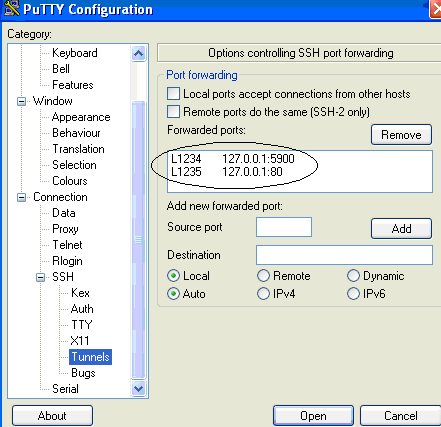
ssh tunneling local:127.0.0.1:1235-->remote:127.0.0.1:80 so you can do http://127.0.0.1:1235/neosys on your own computer
there are a few computers where it doesnt seem to like the above usually where the target server is on a none-standard port or not listening on 127.0.0.1
so sometimes you have to map local 127.0.0.1:8080 to remote 10.0.0.255:8080 or whatever the listening ip and port is
Source: 1234 Destination: 127.0.0.1:5900 then click Add
Source: 1235 Destination: 127.0.0.1:80 then click Add
Once tunnels are setup then return to Session tab in putty and save the options then click open to connect to the server. Login as administrator with the servers password.
Ultra VNC Viewer:
As the port mapping is complete, enter 127.0.0.1:1234 to login into the computer screen remotely:
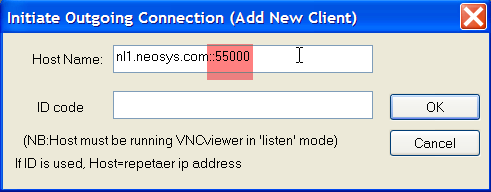
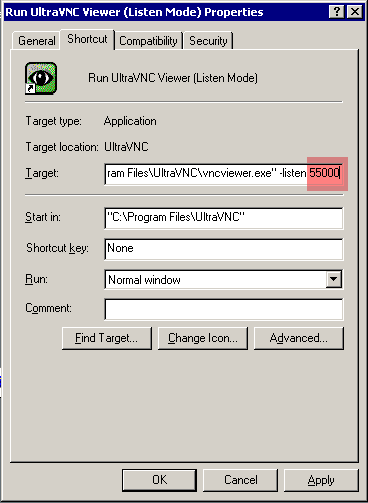
Configuring Ultra VNC Viewer Listen mode to use a non-standard port
Troubleshooting Client
Cygwin login on servers connected to any domain controller
If NEOSYS is loaded on a server which is connected to any domain controller, it may require the local administrator password reset.
Troubleshooting VNC client
Resolving VNC Password lockout
If you connect to a client server through CYGWIN and enter the VNC password 3 times wrong in a row, VNC will block you.
As you have already entered the server through CYGWIN, you can reactivate the blocked VNC by using the following commands on the prompt:
net stop winvnc
net start winvnc
Remote Desktop Connection
Changing RDC port from standard to nonstandard
- Start Registry Editor.
- Locate and then click the following registry subkey:
HKEY_LOCAL_MACHINE\System\CurrentControlSet\Control\TerminalServer\WinStations\RDP-Tcp\PortNumber
- On the Edit menu, click Modify, and then click Decimal.
- Type the new port number, and then click OK.
- Quit Registry Editor.
