Configuring IIS
After you have installed all the NEOSYS program files you need to configure IIS so that you can operate NEOSYS. Instructions are below.
Configuring IIS for windows 2003
Creating a new website in IIS
First step is to stop the default website in IIS. Right click on Default Web Site and select "Stop".
Client Server: Create a website called neosys linked to D:\neosys\neosys.net:
WIN3 Server: Create a website called "clientname" linked to D:\hosts\clientfolder\neosys.net
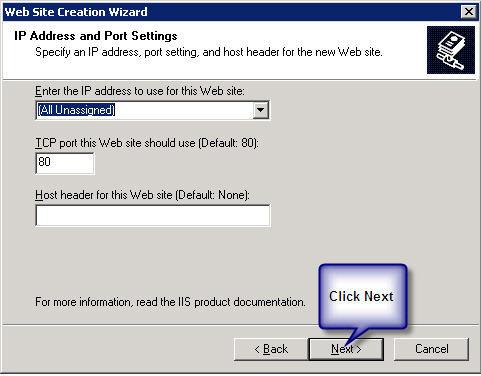
A new window will pop up "IP Address and Port Setting" after completion of the above step.
Client Server: Select *(All Unassigned)* from the drop down list of "Enter the IP address to use for the Web site" and keep the default port as 80.
WIN3 Server: Select the static Ip from the drop down list of "Enter the IP address to use for the Web site" and enter then next port available and click on next.
Client Server: Within the above neosys web site folder create a virtual directory called data linked to D:\neosys\data:
WIN3 Server: Within the above clientwebsite folder create a virtual directory called data linked to D:\hosts\clientfolder\data:
(I haven’t got the screenshot because I can only get it once I create the above)
To allow file uploads
Create IMAGES directory
Client server: create a folder IMAGES under D:\neosys and within the neosys web site folder create a virtual directory called images linked to D:\neosys\images: Modes: READ and WRITE
WIN3 Server: create a folder IMAGES under D:\hosts\clientfolder and within the client web site folder create a virtual directory called images linked to D:\hosts\clientfolder\images: Modes: READ and WRITE
(I haven’t got the screenshot because I can only get it once I create the above)
Permit upload.dll
- Right click on dll ( Default Web Site, neosys, NEOSYS, dll)
- Under Permissions set Execute Permissions: Scripts and Executables
- Internet Information Services (IIS) Manager
- Web Service Extensions
- All Unknown ISAPI Extensions: Allowed
Solving error during file upload: "Page cannot be displayed" HTTP Error 405
This error should not occur in normal NEOSYS installations but the solution is as follows:
- Go to Control Panel, Administrative Tools, Internet Information Services
- Expand the tree to COMPUTERNAME, Web Sites
- Right-click "Default Web Site" (or specific Web Site if multiple NEOSYS http/https installations on the server as per WIN3)
- Properties
- Home Directory
- Configuration
- Mappings, Add
- Browse
- Dynamic Link Libraries *.dll" from the "Files of Type" dropdown
- Find and select D:\NEOSYS\neosys.net\NEOSYS\dll\upload.dll (OR upload.dll in the installation directory)
- Extension Type: dll
- Limit to: All
- Click the "OK" button
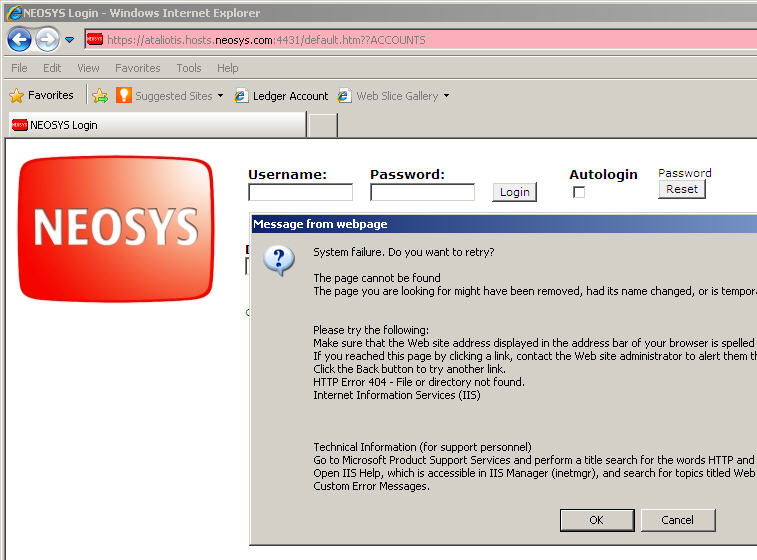
Solving HTTP Error 404 Error occurring immediately on opening NEOSYS login page on a new server installation: "System Failure. Do you want to retry?"
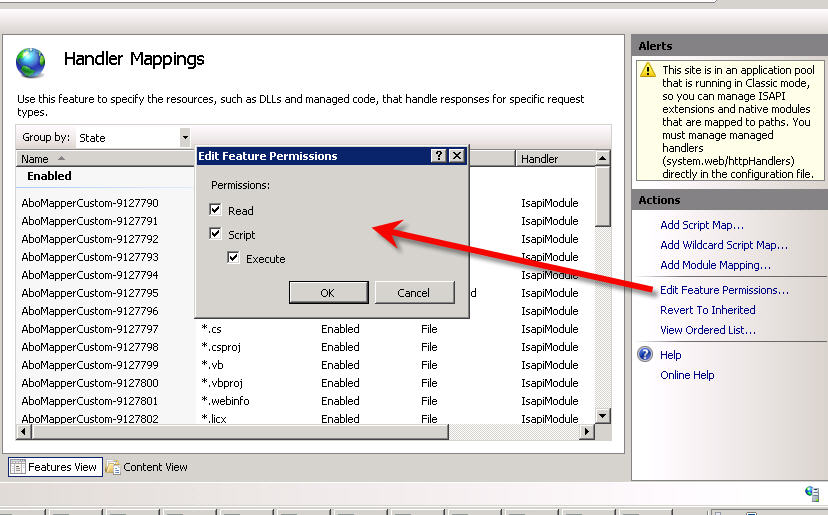
This error message is caused by failing to enable Active Server Pages in the IIS configuration. To resolve this, ensure that Read, Script, Execute is ticked (enabled) in the feature permissions of these Handler Mappings.
This message is from IE8 and a Windows 2003 server. The message may be different for other browser versions.
Message from web page.

System Failure. Do you want to retry?

The page cannot be found
The page you are looking for might have been removed, had its name change, or it temporarily unavailable.

Please try the following:
(omitted)
HTTP Error 404 - File or directory not found.
Internet Information Services (IIS)
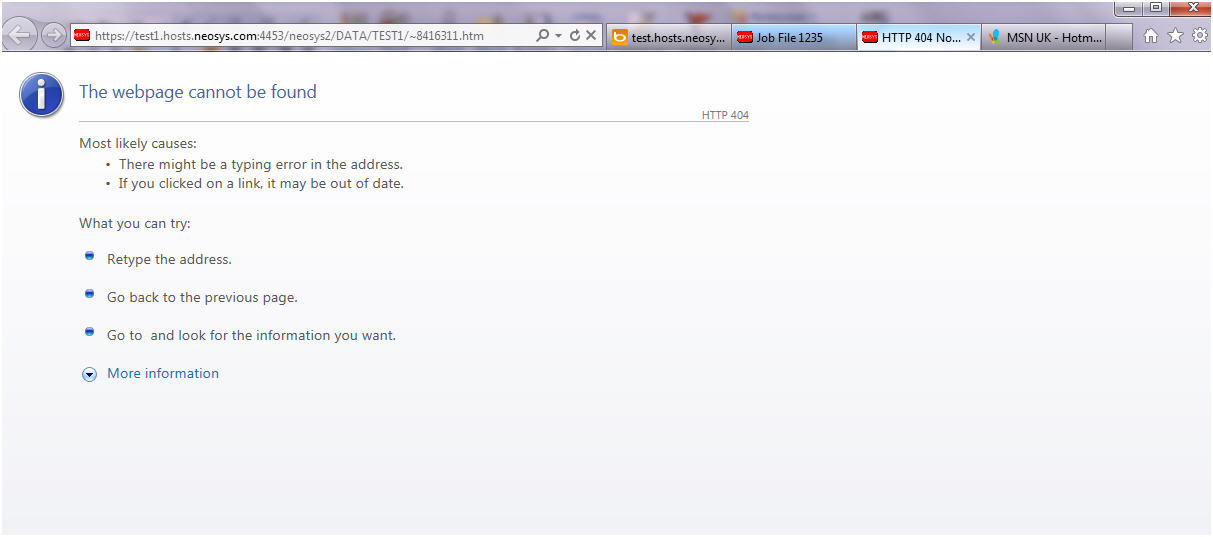
Solving HTTP 404 Webpage cannot be found
This error message clearly states that the page cannot be found. Check for the requested page in the client website folder under the virtual directory data. This page will be available under the data folder in D:\neosys\data. A possible cause of this error is by failing to create a virtual directory called data linked to D:\neosys\data:
Configuring IIS for Windows 2008
Installing IIS
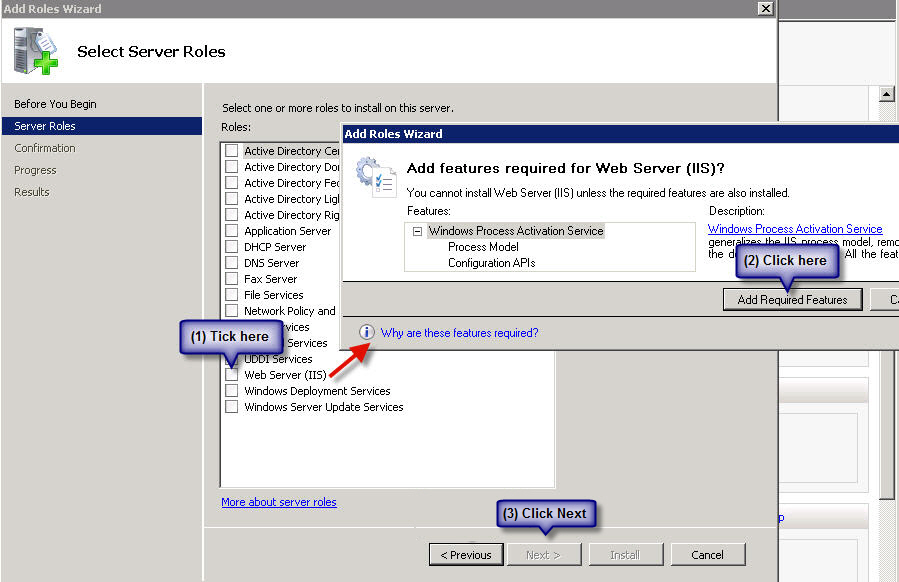
First install IIS from Control Panel > Programs & Features > Turn Windows Features ON or OFF > Add Roles:
On the window that pops up click on next and you will get this screen, tick Web Server (IIS) - on the prompt click on Add Required Resources and then on Next:
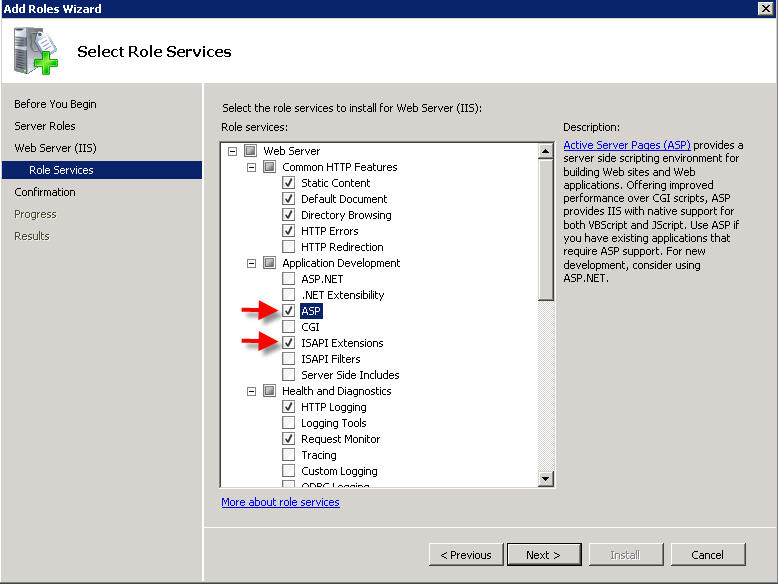
On the next window, click on next until you get this window - tick ASP and ISAPI Extensions:
Click on Next and Finish
Configuring IIS
Create a new Website
After successfully installing IIS, go to Control Panel > Administrative Tools > Computer Management > Services and Applications > Internet Information Services (IIS) > Machine Name > Sites > Default Website.
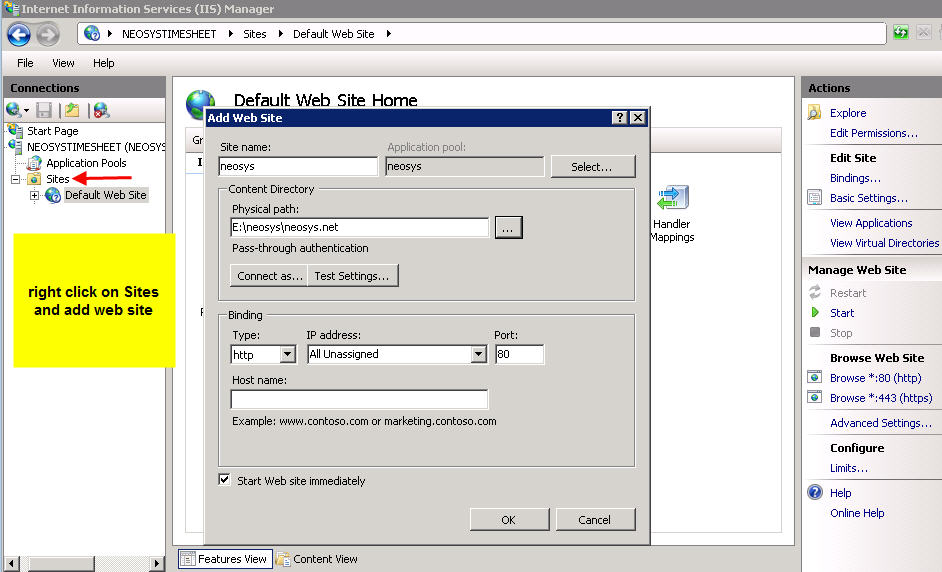
Client Server: Stop the Default Website and then right click on Sites folder and click on Add Website called neosys linked to D:\neosys\neosys.net as shown in the screenshot below
WIN3: Right click on Sites folder and click on Add Website. Create a website called "clientname" linked to D:\hosts\clientfolder\neosys.net; This step requires a binding to be setup, so setup HTTP binding with a port number which is unique, unused and one greater than the previous port used in the series which is 8123 onwards. The highest port number used in this series can be found by checking IIS manager -> NEOSYS ->Sites.
Link Data Folder
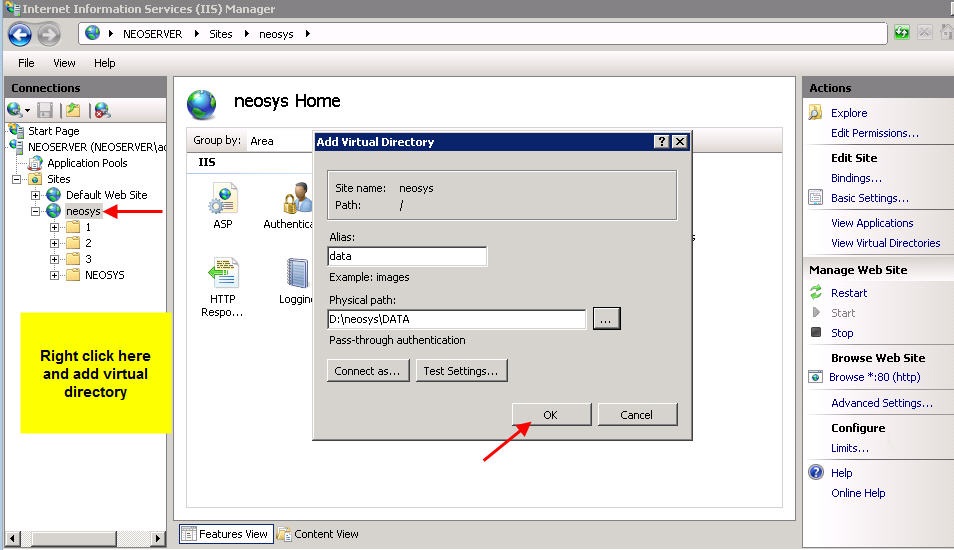
Client Server: Within the neosys website folder create a virtual directory called data linked to D:\neosys\data
WIN3: Within the "clientname" website folder create a virtual directory called data linked to D:\hosts\clientfolder\data
Allow file uploads
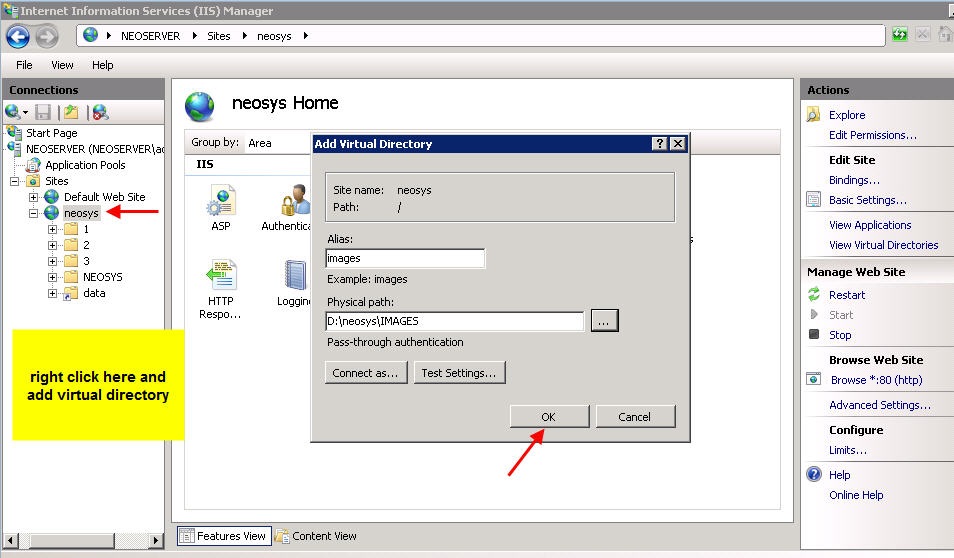
Client Server: create a folder images under D:\neosys and within the neosys web site folder create a virtual directory called images linked to D:\neosys\images
WIN3: create a folder images under D:\hosts\clientfolder and within the "clientname" website folder create a virtual directory called images linked to D:\hosts\clientfolder\images
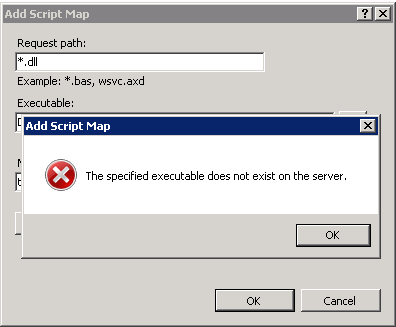
Solving Error "The specified Executable does not exist on the server"
While adding Script Map in Handler Mappings, if you get the below error, this means you have not yet run the Maintenance window/ NEOSYS processes and skipped steps in Installing NEOSYS. File upload.dl_ is installed from NEOSYS.EXE or NEOSYS2.EXE and converted to .dll the first time you run NEOSYS Maintenance/Process. You can also manually rename the file to upload.dll.
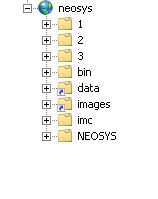
After you add all virtual directories the tree map of the Default Website should look as follows:
Configure file uploads besides adding the images directory
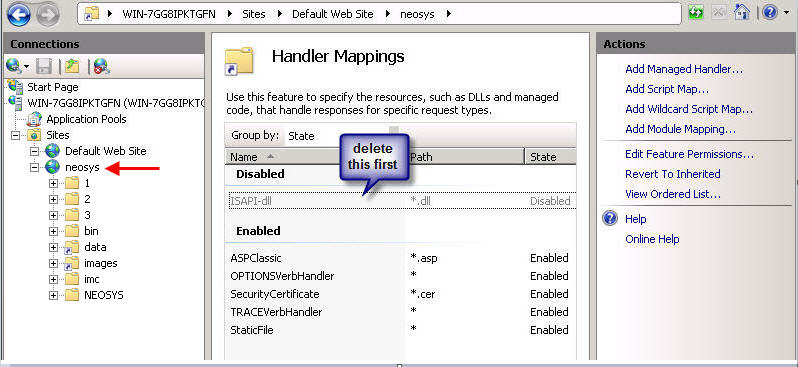
Client Server: Go under IIS > Default Website > neosys
WIN3: Go under IIS>Sites>Clientname Website
Click on Handler Mappings and delete the ISAPI you see there
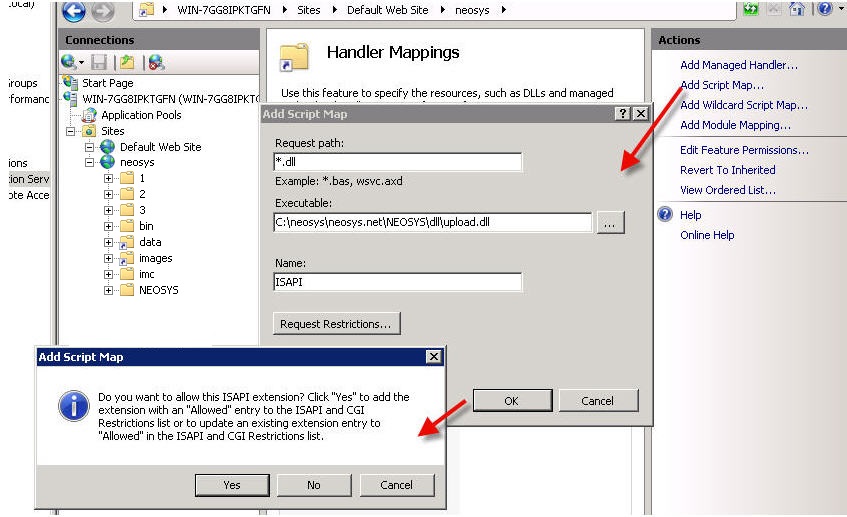
Thereafter click on Add Script Map and fill in the details as follows –
Request path: *.dll
Executable:
- For Client Server: D:\neosys\neosys.net\NEOSYS\dll\upload.dll
- For WIN3: D:\hosts\clientfolder\neosys.net\NEOSYS\dll\upload.dll
Name: ISAPI
Click on OK and on YES in the confirmation box
While entering the Executable in the above step, if you get an error for executable not found (screenshot below) this means you have not yet run the Maintenance window/ NEOSYS processes and missed steps in Installing NEOSYS. File upload.dl_ is installed from NEOSYS.EXE or NEOSYS2.EXE and converted to .dll the first time you run NEOSYS Maintenance/Process. You can also manually rename the file to upload.dll.
Editing the hosts file
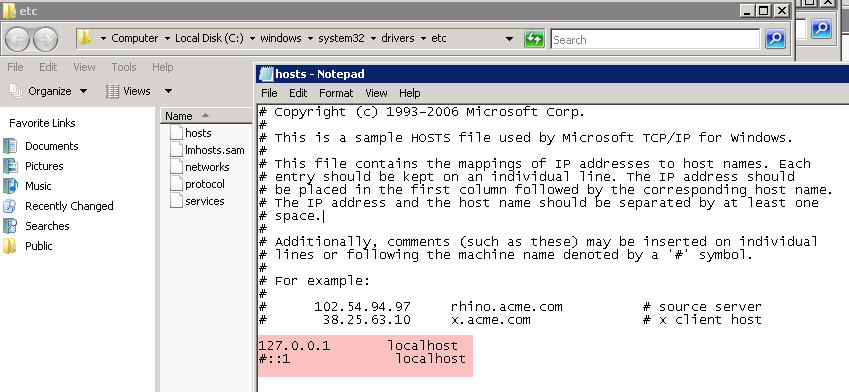
Edit the hosts file under c:\windows\system32\drivers\etc\ - delete the # sign next to 127.0.0.1 localhost and include the # sign before ::1 localhost
Solving IIS error 500 on uploading
To test if permissions are the problem, in grant full control to IUSR over the whole client drectory eg d:\neosys or d:\hosts\clientx in security tab of windows explorer and see if you can upload.
Regardless of the result, remove the full control permissions since they are a security risk.
If permissions are the problem then grant specific permissions as follows:
- images folder - read and write permissions (but not execute)
- dll folder - read and execute permission (no write permission)
Disabling unsecure SSL3 protocol on Windows IIS web server
POODLE is an information leakage attack on client browsers while accessing web server that support the older SSL3 protocol. It is easy to prevent it by reconfiguring web servers to not support SSL3.
Securing IIS web server on win2003 and 2008 by disabling unsafe SSL3 protocol
- For Systems with https installed check if the web server is vulnerable (see Testing for IIS vulnerability ). For systems with no https installed,continue to step2 to prevent SSL3 accidentally being enabled if https is installed in the server in future and then test for vulnerability.
- run the following commands on the server
- reg add "HKLM\SYSTEM\CurrentControlSet\Control\SecurityProviders\SCHANNEL\Protocols\SSL 2.0\Server" /t REG_DWORD /v Enabled /d 0 /f
- reg add "HKLM\SYSTEM\CurrentControlSet\Control\SecurityProviders\SCHANNEL\Protocols\SSL 3.0\Server" /t REG_DWORD /v Enabled /d 0 /f
- reg add "HKEY_LOCAL_MACHINE\SYSTEM\CurrentControlSet\Control\SecurityProviders\SCHANNEL\Ciphers\RC4 40/128" /t REG_DWORD /v Enabled /d 0 /f
- reg add "HKEY_LOCAL_MACHINE\SYSTEM\CurrentControlSet\Control\SecurityProviders\SCHANNEL\Ciphers\RC4 56/128" /t REG_DWORD /v Enabled /d 0 /f
- reg add "HKEY_LOCAL_MACHINE\SYSTEM\CurrentControlSet\Control\SecurityProviders\SCHANNEL\Ciphers\RC4 64/128" /t REG_DWORD /v Enabled /d 0 /f
- reg add "HKEY_LOCAL_MACHINE\SYSTEM\CurrentControlSet\Control\SecurityProviders\SCHANNEL\Ciphers\RC4 128/128" /t REG_DWORD /v Enabled /d 0 /f
- Reboot the server (at any time later using standard NEOSYS rebooting procedure without disturbing users)
- Perform the diagnostic for vulnerability
Testing for IIS vulnerability
A. Determine host and port and where to test from
If you have a public https server that you can access like https://demo.neosys.com:443, in a linux command prompt eg nagios login:
- $HOST for host name like demo.neosys.com
- $PORT with something like 443 or 4430 depending on port forwarding on the public router
or if testing a private https server with no public access, using a cygwin installation on the same server in the cygwin prompt:
- $HOST for host name like 127.0.0.1
- $PORT with something like 443 or 4430 as per IIS manager configuration
If https is enabled on the server/website and you are able to access the website via https using a browser, then you must be able to test for openssl on the same browsed host and port. You must also test this locally to ensure that the right server is being fixed. If the website is not public, then https must not be enabled, which means there is no reason for using cygwin openssl.
B. Check you CAN connect to https server using TLS
openssl s_client -host $HOST -port $PORT
nagios@vm1m:~$ echo|openssl s_client -host demo.neosys.com -port 443
CONNECTED(00000003)
depth=0 CN = demo.neosys.com
verify error:num=20:unable to get local issuer certificate
verify return:1
depth=0 CN = demo.neosys.com
verify error:num=21:unable to verify the first certificate
verify return:1
---
Certificate chain
 0 s:/CN=demo.neosys.com
   i:/CN=demo.neosys.com
---
Server certificate
-----BEGIN CERTIFICATE-----
MIIB2DCCAUWgAwIBAgIQd0J0l4kJrpJHonAv5U8VLjAJBgUrDgMCHQUAMBoxGDAW
BgNVBAMTD2RlbW8ubmVvc3lzLmNvbTAeFw0wODA3MjcxOTUxMDNaFw0zNTEyMTIx
OTUxMDNaMBoxGDAWBgNVBAMTD2RlbW8ubmVvc3lzLmNvbTCBnzANBgkqhkiG9w0B
AQEFAAOBjQAwgYkCgYEAxzwtoqq49vV7pyBQ6Ej+PvbB1QxkdsxNn5EZSLSOppCb
jNjV8fFa98unPR0pGM0UdjWMUYodj12c2pnIrfrtXv7pYf+iC1corPEY7607Icbs
rSOc5aFwnlUYpktoysV1G1crGYgYgXbXgVOUO9phHXJarpKf6SjVw3uXTLlmPUkC
AwEAAaMnMCUwEwYDVR0lBAwwCgYIKwYBBQUHAwEwDgYDVR0PBAcDBQCwAAAAMAkG
BSsOAwIdBQADgYEAmgyW60pT62JuM8GH+KogHW7viaMsifXitm3BC/GfaORpJCox
aS20fAlzGyAlDe9nZWN4roLSxQv0laJkxyNPDuHvLJt1l0FVdk6/vGB6QH0KqM+S
UaUTLsDZ99UNS/inotobxD9vXuKl58Uoe2lu7r9vJ+1DWDC6AyueSZ6xnno=
-----END CERTIFICATE-----
subject=/CN=demo.neosys.com
issuer=/CN=demo.neosys.com
---
No client certificate CA names sent
---
SSL handshake has read 635 bytes and written 411 bytes
---
New, TLSv1/SSLv3, Cipher is AES128-SHA
Server public key is 1024 bit
Secure Renegotiation IS supported
Compression: NONE
Expansion: NONE
SSL-Session:
    Protocol  : TLSv1
    Cipher    : AES128-SHA
    Session-ID: 8A0A00002D51DE183AC2845C6B3FF4BC7485181B4DCBC1758E3A2D5399BDD71C
    Session-ID-ctx:
    Master-Key: B10B9370E4DF70E873873AB9851B3CEF19623E6ADA697955E375D931DEE8301D798B4CB14C8D33FCF1BA066C0CC23897
    Key-Arg   : None
    PSK identity: None
    PSK identity hint: None
    SRP username: None
    Start Time: 1413885416
    Timeout   : 300 (sec)
    Verify return code: 21 (unable to verify the first certificate)
---
DONE
C. Check that you cannot CANNOT to https server using SSL3
openssl s_client -ssl3 -host $HOST -port $PORT
CAN CONNECT = VULNERABLE = NOT OK
If you get this then you need to configure the server to prevent SSL3
nagios@vm1m:~$ echo xxx|openssl s_client -ssl3 -host demo.neosys.com -port 4430
gethostbyname failure
connect:errno=0
nagios@vm1m:~$ echo xxx|openssl s_client -ssl3 -host demo.neosys.com -port 4430
CONNECTED(00000003)
depth=0 CN = demo.neosys.com
verify error:num=20:unable to get local issuer certificate
verify return:1
depth=0 CN = demo.neosys.com
verify error:num=21:unable to verify the first certificate
verify return:1
---
Certificate chain
 0 s:/CN=demo.neosys.com
   i:/CN=demo.neosys.com
---
Server certificate
-----BEGIN CERTIFICATE-----
MIIB3jCCAUugAwIBAgIQNj9FMjT1vIxGo2Mv2Ta9vzAJBgUrDgMCHQUAMB0xGzAZ
BgNVBAMTEmFkbGluZWQubmVvc3lzLmNvbTAeFw0wODAzMjUxMTIxMzFaFw0zNTA4
MTAxMTIxMzFaMB0xGzAZBgNVBAMTEmFkbGluZWQubmVvc3lzLmNvbTCBnzANBgkq
hkiG9w0BAQEFAAOBjQAwgYkCgYEArRuijA8jz3qBm2ZZEwITIJLWIMlQmZxcUvOo
HNZL0+3oJuX0AQqtpRZMp/7ob9agngfwJQ36vK+424zcBbmKxA2MweKZRalN2jz+
rdr1oeZ6/Ff3r8+rCPFj/B8CfMOQbSv6YcR0kVc+8ugybB7qT6Nq5ZWOAczG3Ikt
4EnOlqUCAwEAAaMnMCUwEwYDVR0lBAwwCgYIKwYBBQUHAwEwDgYDVR0PBAcDBQCw
AAAAMAkGBSsOAwIdBQADgYEAHIq5Gn2LiMgXFaUYrFEfHeajD4jAwdFw+zrjcBDZ
qM9LnhndHhdPogow9m9cCv1n57ne9rZL1v7w7Y6C53359hTUVZFqtHFfzcWnNyKD
uHD9a8QDk6/dSwBr/SWIE6OdFUYAj/kDXRQNB5H459spRVa3Yws8vpwrWZhoklxq
CQg=
-----END CERTIFICATE-----
subject=/CN=demo.neosys.com
issuer=/CN=demo.neosys.com
---
No client certificate CA names sent
---
SSL handshake has read 649 bytes and written 342 bytes
---
New, TLSv1/SSLv3, Cipher is RC4-MD5
Server public key is 1024 bit
Secure Renegotiation IS supported
Compression: NONE
Expansion: NONE
SSL-Session:
    Protocol  : SSLv3
    Cipher    : RC4-MD5
    Session-ID: 441A0000EBC1D634B2CDB12924F9B980D2A4CF8C4DD6D3FB9728D3C74F62A8FE
    Session-ID-ctx:
    Master-Key: 38F040BE3E7098857B7CB9FF3B44937786F8F8C002B0042370B29F20EFB582833F9E24CFC8E6560AFD06751DC93412D3
    Key-Arg   : None
    PSK identity: None
    PSK identity hint: None
    SRP username: None
    Start Time: 1413885545
    Timeout   : 7200 (sec)
    Verify return code: 21 (unable to verify the first certificate)
---
DONE
CANNOT CONNECT = NOT VULNERABLE = OK
nagios@vm1m:~$ echo|openssl s_client -ssl3 -host demo.neosys.com -port 443
CONNECTED(00000003)
write:errno=104
---
no peer certificate available
---
No client certificate CA names sent
---
SSL handshake has read 0 bytes and written 0 bytes
---
New, (NONE), Cipher is (NONE)
Secure Renegotiation IS NOT supported
Compression: NONE
Expansion: NONE
SSL-Session:
    Protocol  : SSLv3
    Cipher    : 0000
    Session-ID:
    Session-ID-ctx:
    Master-Key:
    Key-Arg   : None
    PSK identity: None
    PSK identity hint: None
    SRP username: None
    Start Time: 1413885702
    Timeout   : 7200 (sec)
    Verify return code: 0 (ok)
---
Enabling Internet Explorer 6 to access secured https web servers
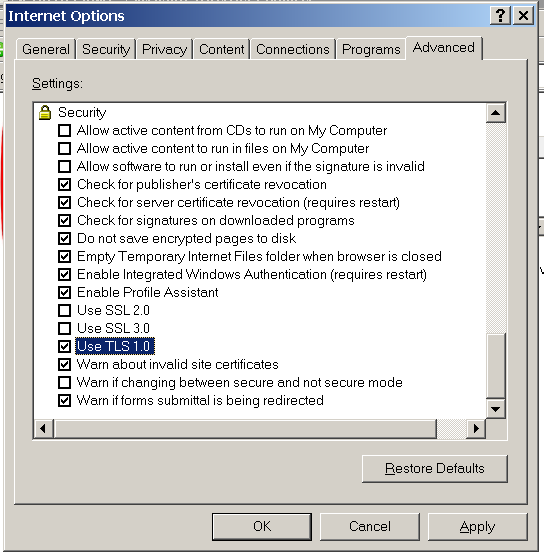
To use Internet explorer 6 (on win2003 and XP-before-SP3) to access secured http web sites you need to enable IE6 to use TLS 1.0. Internet Explorer 6 is present in Windows Server 2003 and Windows XP-pre-SP3.
You can also disable SSL 2.0 and SSL 3.0 for additional safety. This good for later versions of Internet Explorer too.


