Moving NEOSYS: Difference between revisions
| Line 41: | Line 41: | ||
Before restoring the data from live server to backup server and vice versa, do a manual backup (this will not be required if you are doing this procedure after the nightly backup has taken place; and before the users have logged in) and run the '''backup.hostname''' task on backup server. | Before restoring the data from live server to backup server and vice versa, do a manual backup (this will not be required if you are doing this procedure after the nightly backup has taken place; and before the users have logged in) and run the '''backup.hostname''' task on backup server. | ||
====Steps to stop | ====Steps to stop neosys process to start:==== | ||
# Un-tick automatic backup from the configuration file at host server. | # Un-tick automatic backup from the configuration file at host server. | ||
| Line 50: | Line 50: | ||
# Email client giving the new URL to access NEOSYS. | # Email client giving the new URL to access NEOSYS. | ||
# Ask the IT guy to plug-in the backup USB to the server | # Ask the IT guy to plug-in the backup USB to the server | ||
# Configure the drive letter on the configuration file in neosys. | # Configure the drive letter on the configuration file in neosys. | ||
====Steps to restore backup dataset to Live server==== | ====Steps to restore backup dataset to Live server==== | ||
Revision as of 13:51, 8 February 2012
Moving NEOSYS to new servers
Make sure you disable old systems BEFORE you enable new systems.
You cannot count on users to pay attention to WHICH system they are using so its up to you to prevent access to the old system PRIOR to opening a new system for them.
Failure to follow this procedure OFTEN results in chaos in the clients procedures. Missing invoices, etc etc etc.
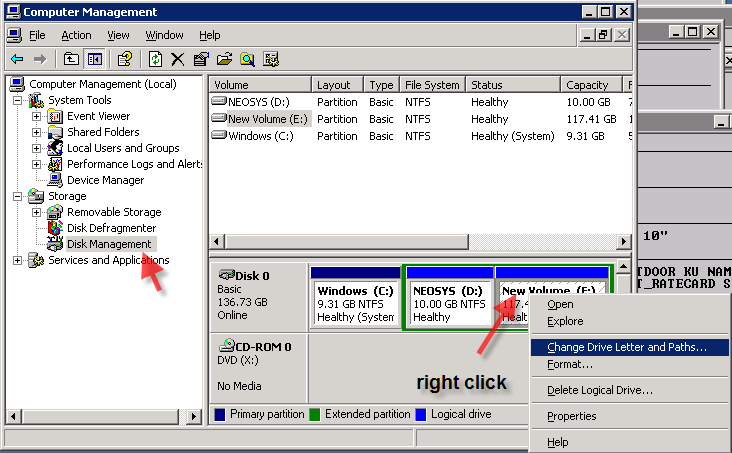
Changing drive letter to match old drive letter
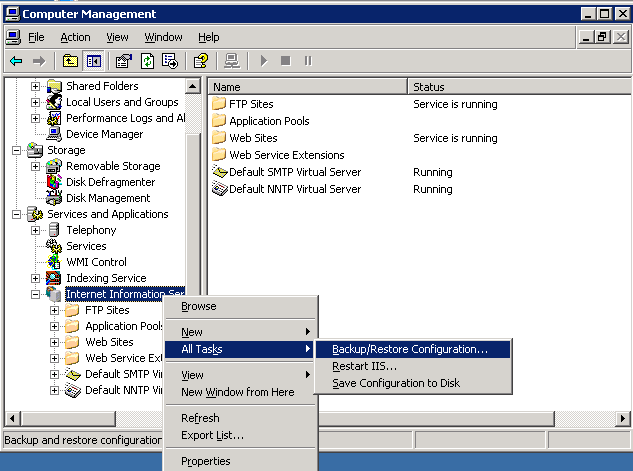
Backup and restore of IIS configuration
How to deauthorisation a NEOSYS installation
Deauthorisation removes the authorisation and gives a pair of "authorisation numbers" that can be run through a check to prove that deauthorisation has been done.
After deauthorisation you cannot use NEOSYS. If you try then it will ask for authorisation again and you cannot use the original authorisation number to reauthorise it.
In NEOSYS Maintenance mode press F5 then type
DEAUTHORISE
... and answer all the questions properly.
At the final stage it will give you the "deauthorisation numbers" which consist of the original computer number plus another number. These numbers should not be lost and should be given to NEOSYS who will verify they are correct.
Reinstating live system from backup system and shifting back
This process should be done only when all the users are offline.
To move the data from live to backup server and to restore it back, follow the steps mentioned below:
Before restoring the data from live server to backup server and vice versa, do a manual backup (this will not be required if you are doing this procedure after the nightly backup has taken place; and before the users have logged in) and run the backup.hostname task on backup server.
Steps to stop neosys process to start:
- Un-tick automatic backup from the configuration file at host server.
- Rename Global.end.temp to Global.end
- Disable schedule task (Copy livedatatotest & start host)
- Disable backup.hostname task at backup server to avoid backup of host server > backup server
- After doing this start neosys processes at backup server and tick the automatic backup option in the configure file.
- Email client giving the new URL to access NEOSYS.
- Ask the IT guy to plug-in the backup USB to the server
- Configure the drive letter on the configuration file in neosys.
Steps to restore backup dataset to Live server
ATTENTION: Send a mail to the client staff, saying NEOSYS will be down from XXXX hours and they should logout from neosys before the mentioned time and save their work.
If possible co-ordinate with IT guy (or the person responsible) to follow up and make sure that users logout by the decided time. Once all the users are offline, Block all users from accessing NEOSYS.
- Take a manual backup of the dataset you want to move to a removable drive (Flash/USB drive)
- Once the backup is complete, go to the configuration file and un-tick the automatic backup from there.
- Now request the IT guy to unplug the USB from the backup server and plug it into the main server.
- Before doing a restore read the NOTE that follows very carefully.
- Now log in to maintenance process and go to General > Backup & Data Management, select Restore from disk or diskette (i.e. option 4), select the backup drive and follow the prompts that follow.
- Now enable all the tasks that were disabled earlier on the live server and then enable the backup.hostname schedule task on backup server.
NOTE:
REMEMBER THAT RESTORE = first DELETE! and then RESTORE
Chat for reference:
DELETE MEANS YOU SHOULD BE FRIGHTENED >> AND THEREFORE TAKE A COPY
In this case you KNOW you have a good working copy of the data on the backup server so DELETING+RESTORE on the main server is not very frightening .. but STILL .. play SAFE .. take a COPY OF WHAT YOU DELETE DURING RESTORE
Moving NEOSYS server to a new/another client office location
This is done by the client IT responsible and we just have to provide this checklist for them to follow. Typically this needs to be emailed out to them.
Please ensure the following procedures are followed on the day of the move:

# Login to the NEOSYS server and shut down all the processes by hitting the ESC button on each of the window three times or until they close
# Take a backup of the D drive on another system or network / external drive
# Remove the USB plugged in and secure the same along with the other two USB’s in a safe location
# You can shut down the server now and move it to your new office

After the move is completed, please ensure the following immediately:

# Connect the server to your local network and complete all setup required for users to be able to access the system internally
# Configure the firewall and/or port settings to enable us to connect to the server externally (i.e. 19580 external to 19580 internal)
# Configure the firewall and/or port settings to your staff for external access (i.e. 4430 external to 4430 internal)
# Provide us with the new fixed IP address so that we can test the connection

