Configuring IIS: Difference between revisions
| (24 intermediate revisions by 6 users not shown) | |||
| Line 47: | Line 47: | ||
# Web Service Extensions | # Web Service Extensions | ||
# All Unknown ISAPI Extensions: Allowed | # All Unknown ISAPI Extensions: Allowed | ||
=== Create "Cache-Control" HTTP Header === | |||
This custom HTTP Header is created so that users will not have to clear browser cache after a NEOSYS upgrade. | |||
#Right click on neosys (Web Sites, neosys) | |||
#Select Properties and click on the HTTP Headers tab | |||
#Add a new custom HTTP Header with "Cache-Control" as header name and "public,max-age=300" as the header value. | |||
[[File:cacheheader.png]] | |||
===[[Backing_up_and_Restoring_IIS_configuration#Set_IIS_automatic_backup_location_to_d:| Set IIS automatic backup location to D:]] === | ===[[Backing_up_and_Restoring_IIS_configuration#Set_IIS_automatic_backup_location_to_d:| Set IIS automatic backup location to D:]] === | ||
== | == Installing IIS for Windows 2008 == | ||
First install IIS from Control Panel > Programs & Features > Turn Windows Features ON or OFF > Add Roles: | First install IIS from Control Panel > Programs & Features > Turn Windows Features ON or OFF > Add Roles: | ||
| Line 68: | Line 76: | ||
Click on Next and Finish | Click on Next and Finish | ||
== Configuring IIS for Windows 2008 and Windows 10== | |||
===Create a new Website=== | |||
After successfully installing IIS, go to Control Panel > Administrative Tools > Computer Management > Services and Applications > Internet Information Services (IIS) > Machine Name > Sites > Default Website. | After successfully installing IIS, go to Control Panel > Administrative Tools > Computer Management > Services and Applications > Internet Information Services (IIS) > Machine Name > Sites > Default Website. | ||
'''Client Server:''' Stop the Default Website | '''Client Server:''' | ||
#Stop the Default Website. | |||
#Right click on Sites folder and click on Add Website. | |||
#Create a website called '''neosys''' and linked to {{Client server Installation Location}}neosys.net as shown in the screenshot below. | |||
'''WIN3:''' Right click on Sites folder and click on Add Website. Create a website called "clientname" linked to {{NEOSYS server Installation Location}}neosys.net | '''WIN3:''' | ||
Since win3 is not connected to any LAN and exclusively serves https only, therefore setup a https binding only with a port number which is unique, unused and one greater than the previous port used in the series which is 4431 onwards. The highest port number used in this series can be found by checking IIS manager -> NEOSYS ->Sites. | #Right click on Sites folder and click on Add Website. | ||
#Create a website called "clientname" linked to {{NEOSYS server Installation Location}}neosys.net as shown in screenshot below. | |||
#Since win3 is not connected to any LAN and exclusively serves https only, therefore setup a https binding only with a port number which is unique, unused and one greater than the previous port used in the series which is 4431 onwards. The highest port number used in this series can be found by checking IIS manager -> NEOSYS ->Sites. | |||
Refer to [[Setting_up_HTTPS#Creating_multiple_HTTPS_web_sites_on_NEOSYS_hosted_server| setting up the https for a site on NEOSYS hosted server]] for details. | Refer to [[Setting_up_HTTPS#Creating_multiple_HTTPS_web_sites_on_NEOSYS_hosted_server| setting up the https for a site on NEOSYS hosted server]] for details. | ||
| Line 81: | Line 94: | ||
[[image:iis4.jpg]] | [[image:iis4.jpg]] | ||
===Link Data Folder=== | |||
'''Client Server:''' Within the neosys website folder create a virtual directory called '''data''' linked to {{Client server Installation Location}}data | '''Client Server:''' Within the neosys website folder create a virtual directory called '''data''' linked to {{Client server Installation Location}}data | ||
| Line 89: | Line 102: | ||
[[image:iis5.jpg]] | [[image:iis5.jpg]] | ||
===Allow file uploads=== | |||
'''Client Server:''' create a folder '''images''' under D:\neosys and within the neosys web site folder create a virtual directory called '''images''' linked to {{Client server Installation Location}}images | '''Client Server:''' create a folder '''images''' under D:\neosys and within the neosys web site folder create a virtual directory called '''images''' linked to {{Client server Installation Location}}images | ||
| Line 97: | Line 110: | ||
[[image:iis7.jpg]] | [[image:iis7.jpg]] | ||
After you add all virtual directories the tree map of the | After you add all virtual directories the tree map of the website should look as follows: | ||
[[image:iis8.jpg]] | [[image:iis8.jpg]] | ||
===Configure file uploads besides adding the images directory=== | |||
#In IIS open Handler mappings in the top server level | |||
#Right click ISAPI-dll and choose Edit Feature Permissions | |||
#Check Execute and save. | |||
This is already setup for win3 | |||
[[image: iisisapi.jpg]] | |||
'''For single site servers follow the steps below only if file upload does not work in NEOSYS after doing the above.''' | |||
Go under IIS > Default Website > neosys | Go under IIS > Default Website > neosys | ||
| Line 123: | Line 144: | ||
[[image:iis9b.jpg]] | [[image:iis9b.jpg]] | ||
[[image:hm.jpg]] | [[image:hm.jpg]] | ||
===Editing the hosts file=== | ===Editing the hosts file=== | ||
| Line 136: | Line 152: | ||
[[image:iis10.jpg]] | [[image:iis10.jpg]] | ||
=== | === IIS web page caching === | ||
Webpage cache is set to 5 mins in neosys.net/web.config on Windows 2008/10 and in IIS configuration on Windows 2003. | |||
If a NEOSYS user opens a web page 5 mins after the file was updated then their computer will get the latest version. | |||
If support team is patching and wants to test without waiting for 5 mins then they will have to press Ctrl+F5 to refresh or perhaps even clear their cache using the usual methods. | |||
===[[Backing_up_and_Restoring_IIS_configuration#Set_IIS_automatic_backup_location_to_d:| Set IIS automatic backup location to D:]] === | |||
== Disabling unsecure SSL3 protocol on Windows IIS web server == | == Disabling unsecure SSL3 protocol on Windows IIS web server == | ||
| Line 710: | Line 640: | ||
==[[Backing up and Restoring IIS configuration]]== | ==[[Backing up and Restoring IIS configuration]]== | ||
== Solving IIS errors == | |||
=== Solving error during file upload: "Page cannot be displayed" HTTP Error 405 in windows 2003 === | |||
This error should not occur in normal NEOSYS installations but the solution is as follows: | |||
# Go to Control Panel, Administrative Tools, Internet Information Services | |||
# Expand the tree to COMPUTERNAME, Web Sites | |||
# Right-click "Default Web Site" (or specific Web Site if multiple NEOSYS http/https installations on the server as per WIN3) | |||
# Properties | |||
# Home Directory | |||
# Configuration | |||
# Mappings, Add | |||
# Browse | |||
# Dynamic Link Libraries *.dll" from the "Files of Type" dropdown | |||
# Find and select D:\NEOSYS\neosys.net\NEOSYS\dll\upload.dll (OR upload.dll in the installation directory) | |||
# Extension Type: dll | |||
# Limit to: All | |||
# Click the "OK" button | |||
=== Solving error during file upload: "HTTP verb used to access this page is not allowed" HTTP Error 405 in windows 2008 === | |||
Cause: This error occurs when upload.dll is not set up on IIS | |||
Solution: Ensure upload.dll is setup as per configuration: [[Configuring_IIS#Configure_file_uploads_besides_adding_the_images_directory|Setting up upload.dll]] | |||
[[File:uploadiis2.jpg]] | |||
=== Solving "HTTP Error 503. The service is unavailable." === | |||
Look in event log for errors saying various dlls have failed to load eg | |||
The Module DLL C:\Windows\System32\inetsrv\authsspi.dll failed to load. The data is the error. | |||
These errors indicate that IIS is configured to use various modules that have not been installed, possibly due to restoration of IIS configuration backups which mention them but the restore program restores the configuration but does not install the dll. They may not even be required, but how to exclude them is not solved in this article. | |||
Solution is to install the various required modules by right clicking IIS role and choosing Add Role Service | |||
*inetsrv\filter.dll - ISAPI Filters | |||
*validcfg.dll - .NET Extensibility? | |||
*iis_ssi.dll - Server Side Includes | |||
*authsspi.dll - Windows Authentication | |||
A list of module names mapped to dll files can be found in the IIS configuration file. This may give a clue what module is required to be added in Programs and Features or Roles. Alternatively, the module may no longer be required on a new server and can be deleted from the configuration file (take a backup. this may could cause other strange errors, perhaps much later on) and IIS restarted with the new configuration. | |||
cd C:\Windows\System32\inetsrv\config | |||
notepad applicationHost.config | |||
Example from neosys win3: | |||
<pre> | |||
<globalModules> | |||
<add name="UriCacheModule" image="%windir%\System32\inetsrv\cachuri.dll" /> | |||
<add name="FileCacheModule" image="%windir%\System32\inetsrv\cachfile.dll" /> | |||
<add name="TokenCacheModule" image="%windir%\System32\inetsrv\cachtokn.dll" /> | |||
<add name="HttpCacheModule" image="%windir%\System32\inetsrv\cachhttp.dll" /> | |||
<add name="StaticCompressionModule" image="%windir%\System32\inetsrv\compstat.dll" /> | |||
<add name="DefaultDocumentModule" image="%windir%\System32\inetsrv\defdoc.dll" /> | |||
<add name="DirectoryListingModule" image="%windir%\System32\inetsrv\dirlist.dll" /> | |||
<add name="ProtocolSupportModule" image="%windir%\System32\inetsrv\protsup.dll" /> | |||
<add name="StaticFileModule" image="%windir%\System32\inetsrv\static.dll" /> | |||
<add name="AnonymousAuthenticationModule" image="%windir%\System32\inetsrv\authanon.dll" /> | |||
<add name="RequestFilteringModule" image="%windir%\System32\inetsrv\modrqflt.dll" /> | |||
<add name="CustomErrorModule" image="%windir%\System32\inetsrv\custerr.dll" /> | |||
<add name="HttpLoggingModule" image="%windir%\System32\inetsrv\loghttp.dll" /> | |||
<add name="RequestMonitorModule" image="%windir%\System32\inetsrv\iisreqs.dll" /> | |||
<add name="IsapiModule" image="%windir%\System32\inetsrv\isapi.dll" /> | |||
<add name="IsapiFilterModule" image="%windir%\System32\inetsrv\filter.dll" /> | |||
<add name="ConfigurationValidationModule" image="%windir%\System32\inetsrv\validcfg.dll" /> | |||
<add name="ManagedEngine" image="%windir%\Microsoft.NET\Framework\v2.0.50727\webengine.dll" preCondition="integratedMode,runtimeVersionv2.0,bitness32" /> | |||
<add name="ServerSideIncludeModule" image="%windir%\System32\inetsrv\iis_ssi.dll" /> | |||
<add name="WindowsAuthenticationModule" image="%windir%\System32\inetsrv\authsspi.dll" /> | |||
<add name="ManagedEngineV4.0_32bit" image="c:\Windows\Microsoft.NET\Framework\v4.0.30319\webengine4.dll" preCondition="integratedMode,runtimeVersionv4.0,bitness32" /> | |||
<add name="ManagedEngineV4.0_64bit" image="c:\Windows\Microsoft.NET\Framework64\v4.0.30319\webengine4.dll" preCondition="integratedMode,runtimeVersionv4.0,bitness64" /> | |||
</globalModules> | |||
</pre> | |||
=== Solving HTTP Error 404 Error occurring immediately on opening NEOSYS login page on a new server installation: "System Failure. Do you want to retry?" === | |||
This error message is caused by failing to enable Active Server Pages in the IIS configuration. To resolve this in windows 2008, [[Configuring_IIS#Configure_file_uploads_besides_adding_the_images_directory| ensure that Read, Script, Execute is ticked (enabled) in the feature permissions of these Handler Mappings.]] | |||
This message is from IE8 and a Windows 2003 server. The message may be different for other browser versions. | |||
<pre> | |||
Message from web page. | |||
System Failure. Do you want to retry? | |||
The page cannot be found | |||
The page you are looking for might have been removed, had its name change, or it temporarily unavailable. | |||
Please try the following: | |||
(omitted) | |||
HTTP Error 404 - File or directory not found. | |||
Internet Information Services (IIS) | |||
</pre> | |||
[[image:http404.jpg]] | |||
=== Solving HTTP 404 Webpage cannot be found === | |||
This error message clearly states that the page cannot be found. Check for the requested page in the client website folder under the virtual directory data. This page will be available under the data folder in D:\neosys\data. A possible cause of this error is by failing to create a virtual directory called data linked to D:\neosys\data: | |||
[[image:http404p.jpg]] | |||
=== Solving "Service unavailable" error due to disabled application pool === | |||
====Problem:==== | |||
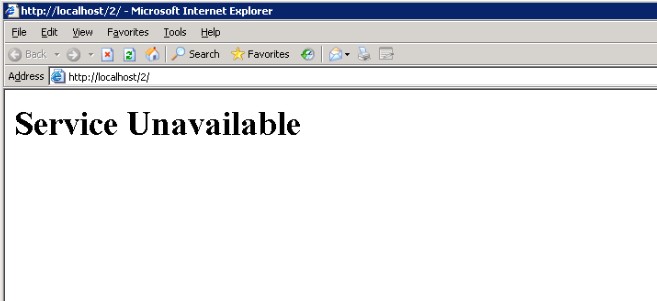
Browser shows "Service unavailable" when trying to access NEOSYS | |||
[[image:serviceunavailable.jpg]] | |||
Check if IIS application pool is disabled. IIS application pool gets automatically disabled after a series of worker process failures. | |||
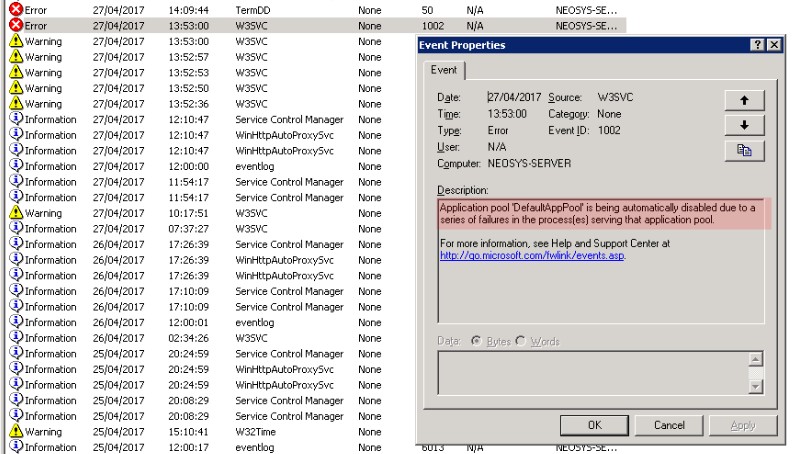
Open system logs and check for W3SVC error with event ID 1002 to confirm that the application pool was disabled automatically due to a series of failures in the process(es) serving that application pool. | |||
[[image:w3svcerror.jpg]] | |||
====Solution:==== | |||
Open IIS, expand application pools, right-click the application pool that was automatically disabled, and click Start. | |||
Browse to NEOSYS website to check if the problem is fixed. | |||
====Additional Information:==== | |||
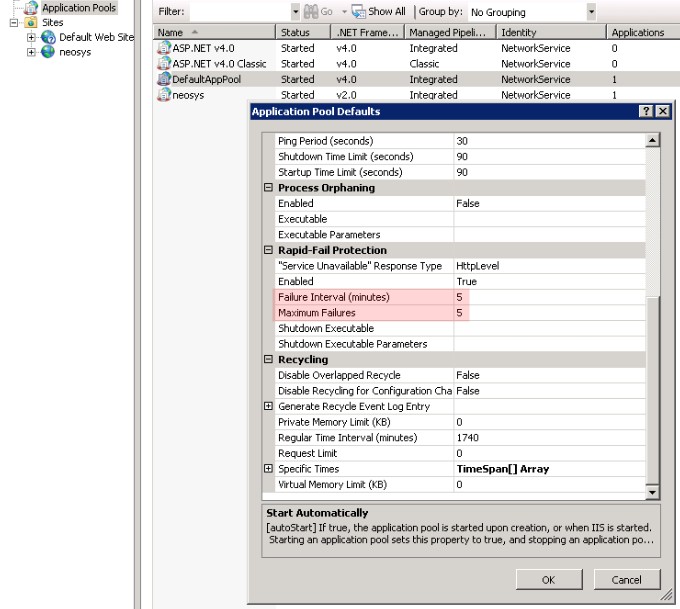
To view the settings for the number of process failures after which the application pool gets disabled, go to IIS, expand application pools, right-click the application pool, click "Set Application Pool Defaults" (for Windows Server 2003, right-click the application pool, click properties and then go to the "Health" tab). | |||
"Rapid-Fail Protection" is the feature that disables the application if there are a certain number of worker process failures within a specified time period. | |||
As per the configuration shown in the example screenshot below, application pool "DefaultAppPool" will be automatically disabled if 5 or more worker process failures happen within a time period of 5 minutes. | |||
[[image:apppool.jpg]] | |||
===Solving Error "The specified Executable does not exist on the server"=== | |||
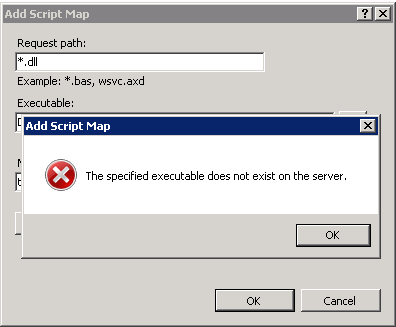
While adding Script Map in Handler Mappings in the above step, if you get the below error, this means you have not yet run the Maintenance window/ NEOSYS processes and skipped steps in Installing NEOSYS. File upload.dl_ is installed from NEOSYS.EXE or NEOSYS2.EXE and converted to .dll the first time you run NEOSYS Maintenance/Process. You can also manually rename the file to upload.dll. | |||
[[image:Dll_error.png]] | |||
=== Solving IIS error 500 on uploading for windows 2008=== | |||
To test if permissions are the problem, in grant full control to IUSR over the whole client directory e.g d:\neosys or d:\hosts\clientx in security tab of windows explorer and see if you can upload. | |||
Regardless of the result, remove the full control permissions since they are a security risk. | |||
If permissions are the problem then grant specific permissions as follows: | |||
#images folder - read and write permissions (but not execute) | |||
#dll folder - read and execute permission (no write permission) | |||
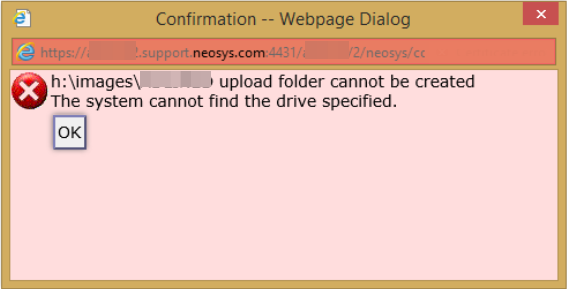
=== Solving error "Upload folder cannot be created.The system cannot find the drive specified" === | |||
This error message comes up when the file uploads are configured to a different location in the software than what is set up in IIS. | |||
There is an internal system configuration in line 49 of the DOS SYSTEM.CFG file which mentions the upload folder location (normally blank which means xxxxxx\images\ where xxxxxx is the installation directory e.g d:\neosys) | |||
In installations where the images are uploaded to a place other than the installation directory, the configuration may say something like h:\images\ where h represents the drive where the folder is located e.g on an external USB drive. This may be done in case of client installations where file uploads are configured on USB drives due to a huge number of files getting uploaded. | |||
The IIS and internal system configuration must agree, otherwise users will probably not be able to upload files, or the uploaded files may not be saved in the right place and may be lost, not backed up and/or not viewable. | |||
To fix this issue, you MUST link the '''images''' folder in IIS to xxxxxx\images\ where xxxxxx is the directory of the images folder as shown in the error message. | |||
[[File:Uploaderror.png]] | |||
===[[Troubleshooting_NEOSYS_Generally#Solving_.E2.80.9Cpage_not_found.E2.80.9D_or_.22HTTP_Error_404.3_-_Not_Found.22_when_downloading_some_file_types_after_uploading_them_successfully|Solving “page not found” or "HTTP Error 404.3 - Not Found" when downloading some file types after uploading them successfully]] === | |||
Latest revision as of 21:34, 2 December 2019
After you have installed all the NEOSYS program files you need to configure IIS so that you can operate NEOSYS. Instructions are below.
Configuring IIS for windows 2003
Creating a new website in IIS
First step is to stop the default website in IIS. Right click on Default Web Site and select "Stop".
Client Server: Create a website called neosys linked to D:\neosys\neosys.net:
WIN3 Server: Create a website called "clientname" linked to D:\hosts\clientfolder\neosys.net
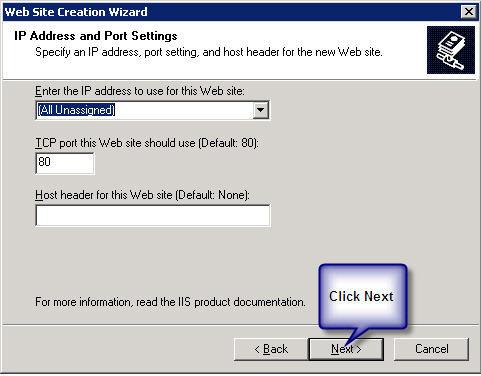
A new window will pop up "IP Address and Port Setting" after completion of the above step.
Client Server: Select *(All Unassigned)* from the drop down list of "Enter the IP address to use for the Web site" and keep the default port as 80.
WIN3 Server: Select the static Ip from the drop down list of "Enter the IP address to use for the Web site" and enter then next port available and click on next.
Client Server: Within the above neosys web site folder create a virtual directory called data linked to D:\neosys\data:
WIN3 Server: Within the above clientwebsite folder create a virtual directory called data linked to D:\hosts\clientfolder\data:
(I haven’t got the screenshot because I can only get it once I create the above)
To allow file uploads
Create IMAGES directory
Client server: create a folder IMAGES under D:\neosys and within the neosys web site folder create a virtual directory called images linked to D:\neosys\images: Modes: READ and WRITE
WIN3 Server: create a folder IMAGES under D:\hosts\clientfolder and within the client web site folder create a virtual directory called images linked to D:\hosts\clientfolder\images: Modes: READ and WRITE
(I haven’t got the screenshot because I can only get it once I create the above)
Permit upload.dll
- Right click on dll ( Default Web Site, neosys, NEOSYS, dll)
- Under Permissions set Execute Permissions: Scripts and Executables
- Internet Information Services (IIS) Manager
- Web Service Extensions
- All Unknown ISAPI Extensions: Allowed
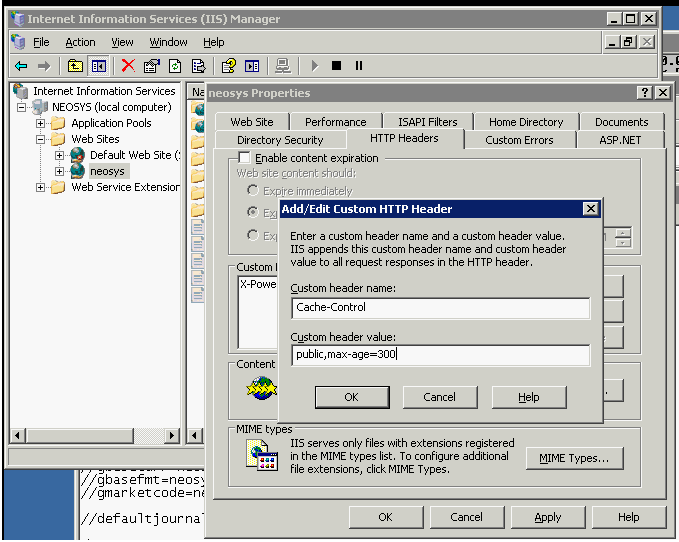
Create "Cache-Control" HTTP Header
This custom HTTP Header is created so that users will not have to clear browser cache after a NEOSYS upgrade.
- Right click on neosys (Web Sites, neosys)
- Select Properties and click on the HTTP Headers tab
- Add a new custom HTTP Header with "Cache-Control" as header name and "public,max-age=300" as the header value.
Set IIS automatic backup location to D:
Installing IIS for Windows 2008
First install IIS from Control Panel > Programs & Features > Turn Windows Features ON or OFF > Add Roles:
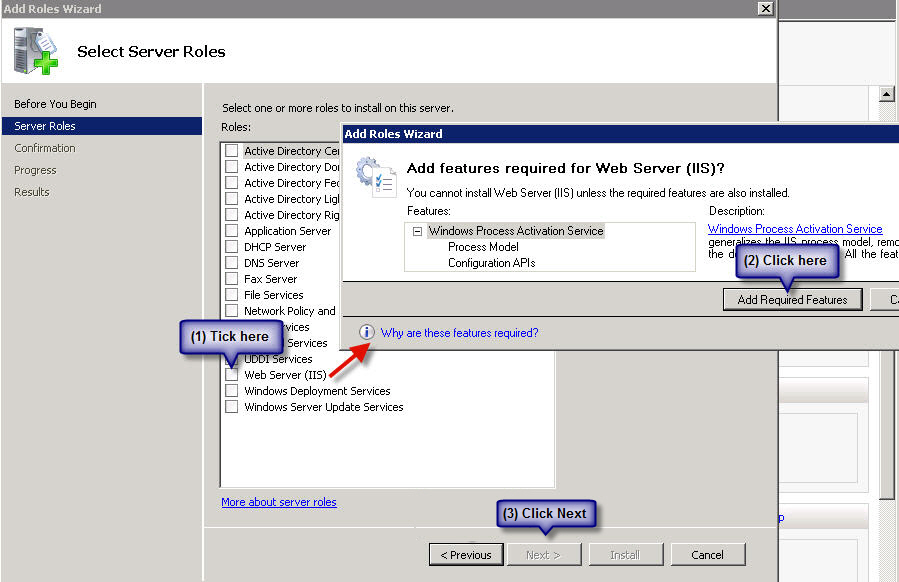
On the window that pops up click on next and you will get this screen, tick Web Server (IIS) - on the prompt click on Add Required Resources and then on Next:
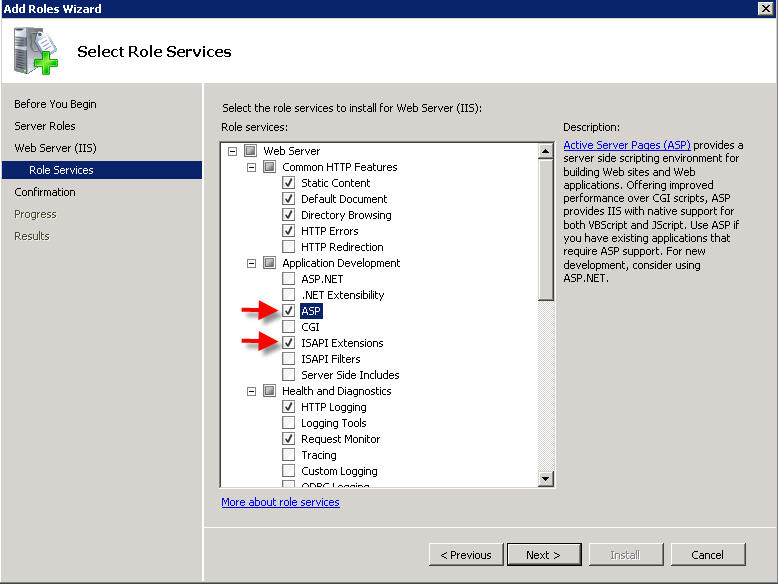
On the next window, click on next until you get this window - tick ASP and ISAPI Extensions:
Click on Next and Finish
Configuring IIS for Windows 2008 and Windows 10
Create a new Website
After successfully installing IIS, go to Control Panel > Administrative Tools > Computer Management > Services and Applications > Internet Information Services (IIS) > Machine Name > Sites > Default Website.
Client Server:
- Stop the Default Website.
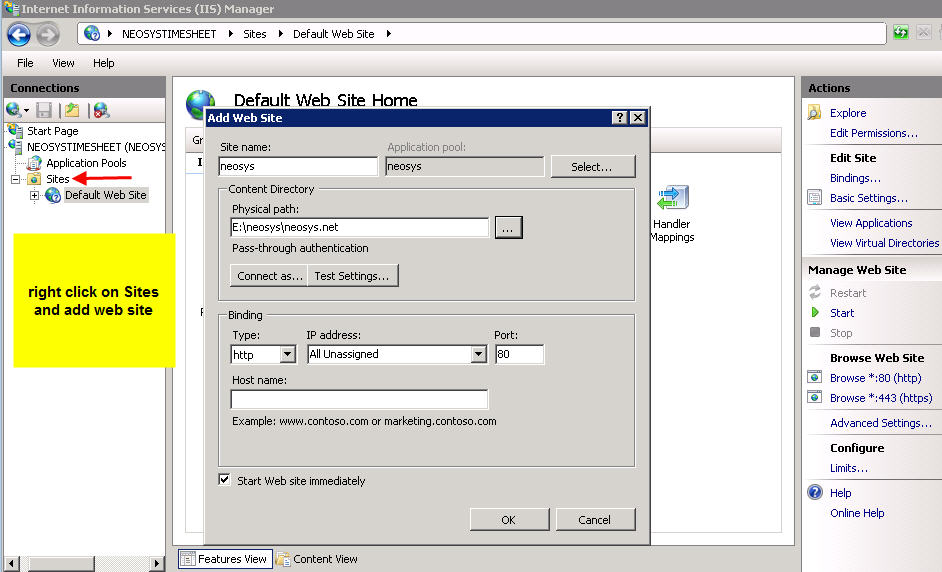
- Right click on Sites folder and click on Add Website.
- Create a website called neosys and linked to D:\neosys\neosys.net as shown in the screenshot below.
WIN3:
- Right click on Sites folder and click on Add Website.
- Create a website called "clientname" linked to D:\hosts\clientfolder\neosys.net as shown in screenshot below.
- Since win3 is not connected to any LAN and exclusively serves https only, therefore setup a https binding only with a port number which is unique, unused and one greater than the previous port used in the series which is 4431 onwards. The highest port number used in this series can be found by checking IIS manager -> NEOSYS ->Sites.
Refer to setting up the https for a site on NEOSYS hosted server for details.
Link Data Folder
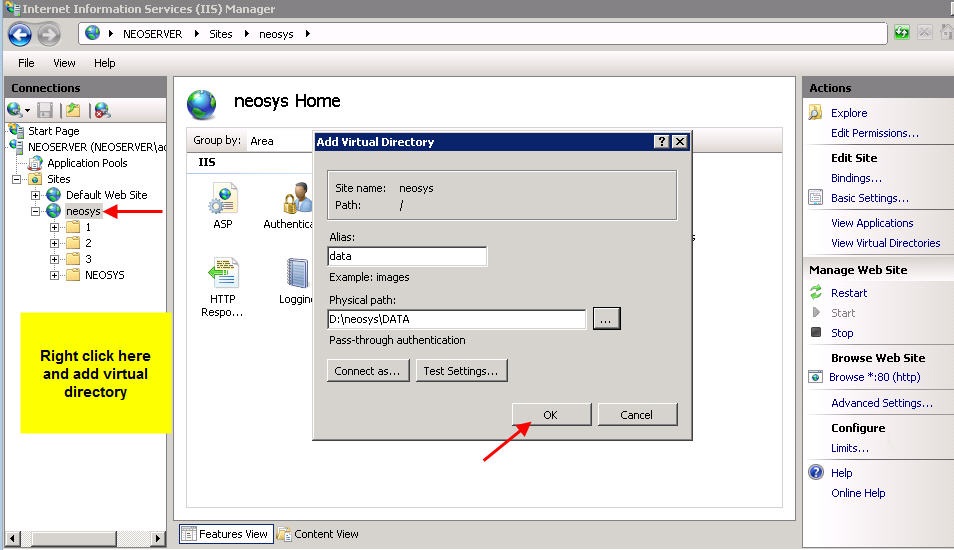
Client Server: Within the neosys website folder create a virtual directory called data linked to D:\neosys\data
WIN3: Within the "clientname" website folder create a virtual directory called data linked to D:\hosts\clientfolder\data
Allow file uploads
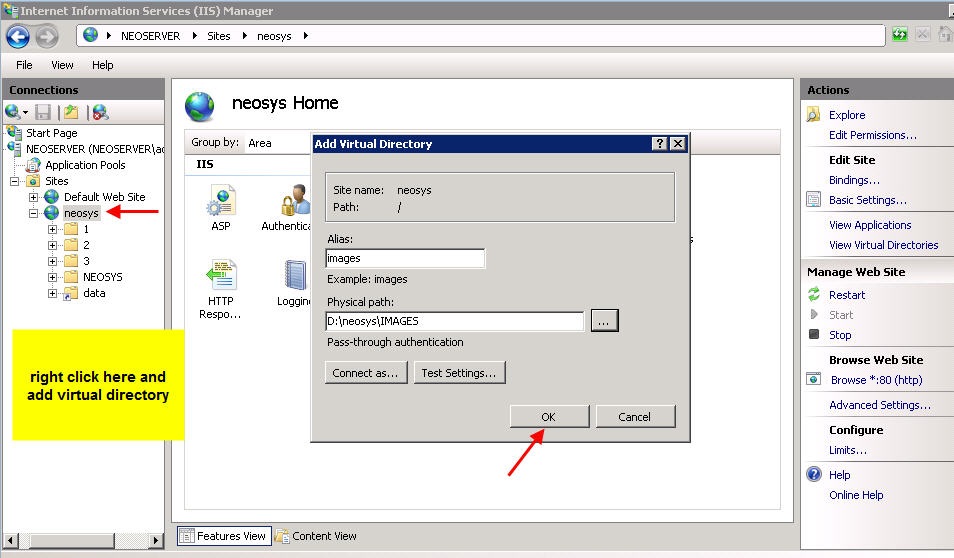
Client Server: create a folder images under D:\neosys and within the neosys web site folder create a virtual directory called images linked to D:\neosys\images
WIN3: create a folder images under D:\hosts\clientfolder and within the "clientname" website folder create a virtual directory called images linked to D:\hosts\clientfolder\images
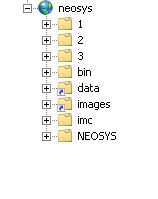
After you add all virtual directories the tree map of the website should look as follows:
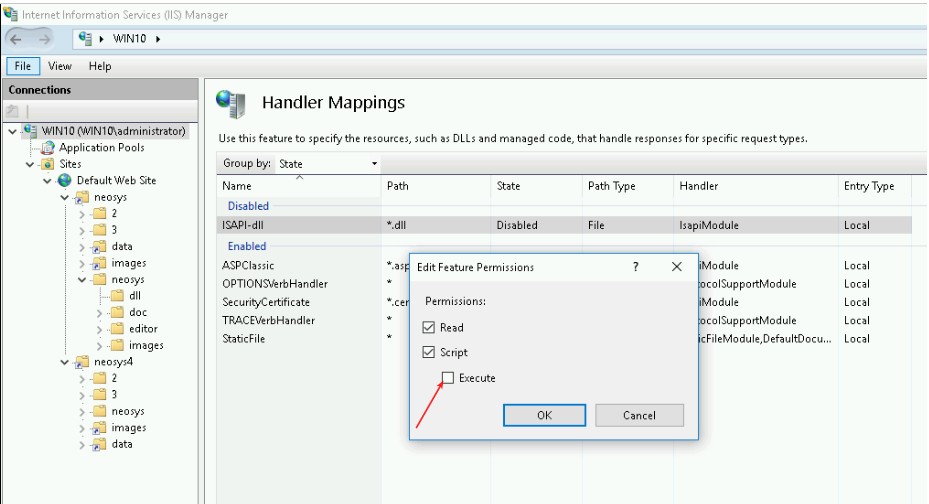
Configure file uploads besides adding the images directory
- In IIS open Handler mappings in the top server level
- Right click ISAPI-dll and choose Edit Feature Permissions
- Check Execute and save.
This is already setup for win3
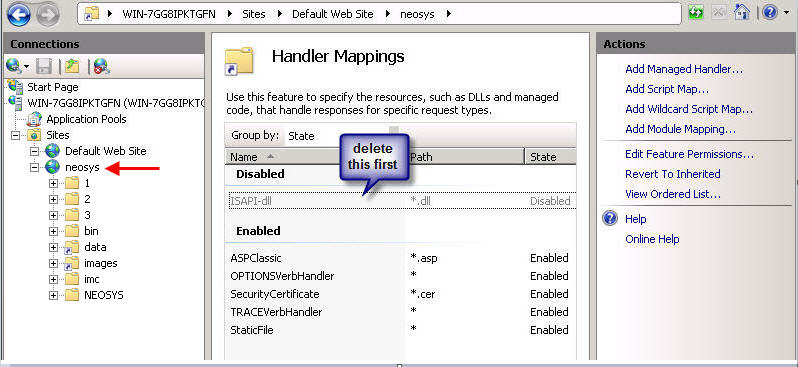
For single site servers follow the steps below only if file upload does not work in NEOSYS after doing the above.
Go under IIS > Default Website > neosys
Click on Handler Mappings and delete the ISAPI you see there
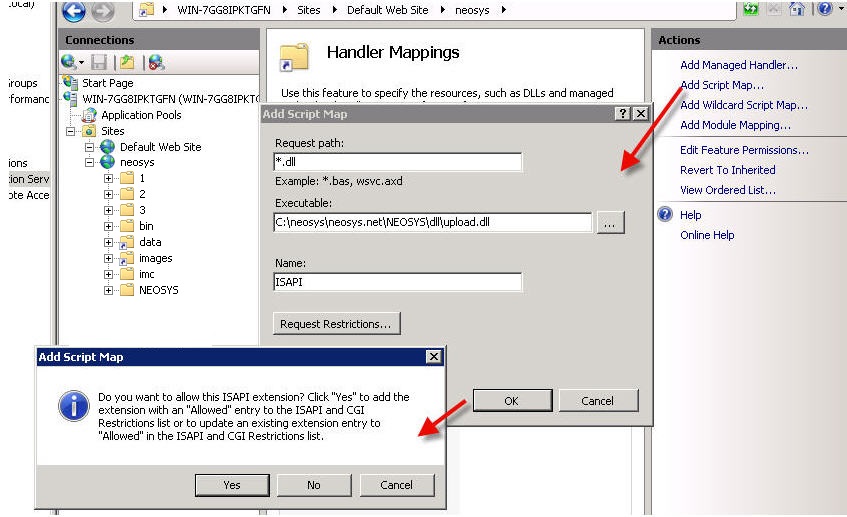
Thereafter click on Add Script Map and fill in the details as follows –
Request path: *.dll
Executable: D:\neosys\neosys.net\NEOSYS\dll\upload.dll
Name: ISAPI
Click on OK and on YES in the confirmation box
Editing the hosts file
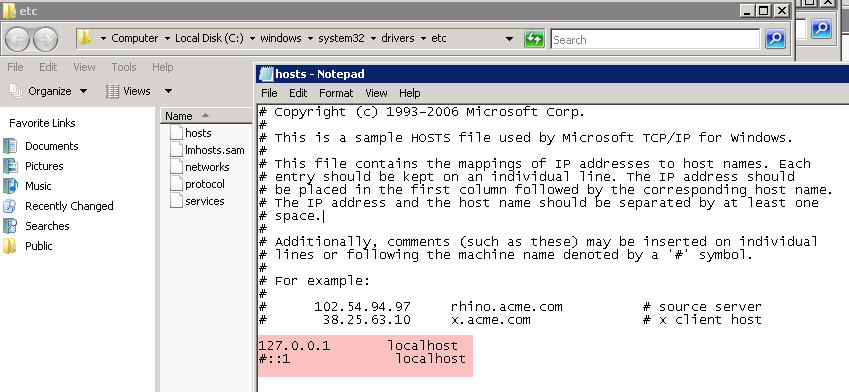
Edit the hosts file under c:\windows\system32\drivers\etc\ - delete the # sign next to 127.0.0.1 localhost and include the # sign before ::1 localhost
IIS web page caching
Webpage cache is set to 5 mins in neosys.net/web.config on Windows 2008/10 and in IIS configuration on Windows 2003.
If a NEOSYS user opens a web page 5 mins after the file was updated then their computer will get the latest version.
If support team is patching and wants to test without waiting for 5 mins then they will have to press Ctrl+F5 to refresh or perhaps even clear their cache using the usual methods.
Set IIS automatic backup location to D:
Disabling unsecure SSL3 protocol on Windows IIS web server
POODLE is an information leakage attack on client browsers while accessing web server that support the older SSL3 protocol. It is easy to prevent it by reconfiguring web servers to not support SSL3.
Securing IIS web server on win2003 and 2008 by disabling unsafe SSL3 protocol
- For Systems with https installed check if the web server is vulnerable (see Testing for IIS vulnerability ). For systems with no https installed,continue to step2 to prevent SSL3 accidentally being enabled if https is installed in the server in future and then test for vulnerability.
- run the following commands on the server
- reg add "HKLM\SYSTEM\CurrentControlSet\Control\SecurityProviders\SCHANNEL\Protocols\SSL 2.0\Server" /t REG_DWORD /v Enabled /d 0 /f
- reg add "HKLM\SYSTEM\CurrentControlSet\Control\SecurityProviders\SCHANNEL\Protocols\SSL 3.0\Server" /t REG_DWORD /v Enabled /d 0 /f
- reg add "HKEY_LOCAL_MACHINE\SYSTEM\CurrentControlSet\Control\SecurityProviders\SCHANNEL\Ciphers\RC4 40/128" /t REG_DWORD /v Enabled /d 0 /f
- reg add "HKEY_LOCAL_MACHINE\SYSTEM\CurrentControlSet\Control\SecurityProviders\SCHANNEL\Ciphers\RC4 56/128" /t REG_DWORD /v Enabled /d 0 /f
- reg add "HKEY_LOCAL_MACHINE\SYSTEM\CurrentControlSet\Control\SecurityProviders\SCHANNEL\Ciphers\RC4 64/128" /t REG_DWORD /v Enabled /d 0 /f
- reg add "HKEY_LOCAL_MACHINE\SYSTEM\CurrentControlSet\Control\SecurityProviders\SCHANNEL\Ciphers\RC4 128/128" /t REG_DWORD /v Enabled /d 0 /f
- Reboot the server (at any time later using standard NEOSYS rebooting procedure without disturbing users)
- Perform the diagnostic for vulnerability
Testing for IIS vulnerability
A. Determine host and port and where to test from
If you have a public https server that you can access like https://demo.neosys.com:443, in a linux command prompt eg nagios login:
- $HOST for host name like demo.neosys.com
- $PORT with something like 443 or 4430 depending on port forwarding on the public router
or if testing a private https server with no public access, using a cygwin installation on the same server in the cygwin prompt:
- $HOST for host name like 127.0.0.1
- $PORT with something like 443 or 4430 as per IIS manager configuration
If https is enabled on the server/website and you are able to access the website via https using a browser, then you must be able to test for openssl on the same browsed host and port. You must also test this locally to ensure that the right server is being fixed. If the website is not public, then https must not be enabled, which means there is no reason for using cygwin openssl.
B. Check you CAN connect to https server using TLS
openssl s_client -host $HOST -port $PORT
nagios@vm1m:~$ echo|openssl s_client -host demo.neosys.com -port 443
CONNECTED(00000003)
depth=0 CN = demo.neosys.com
verify error:num=20:unable to get local issuer certificate
verify return:1
depth=0 CN = demo.neosys.com
verify error:num=21:unable to verify the first certificate
verify return:1
---
Certificate chain
 0 s:/CN=demo.neosys.com
   i:/CN=demo.neosys.com
---
Server certificate
-----BEGIN CERTIFICATE-----
MIIB2DCCAUWgAwIBAgIQd0J0l4kJrpJHonAv5U8VLjAJBgUrDgMCHQUAMBoxGDAW
BgNVBAMTD2RlbW8ubmVvc3lzLmNvbTAeFw0wODA3MjcxOTUxMDNaFw0zNTEyMTIx
OTUxMDNaMBoxGDAWBgNVBAMTD2RlbW8ubmVvc3lzLmNvbTCBnzANBgkqhkiG9w0B
AQEFAAOBjQAwgYkCgYEAxzwtoqq49vV7pyBQ6Ej+PvbB1QxkdsxNn5EZSLSOppCb
jNjV8fFa98unPR0pGM0UdjWMUYodj12c2pnIrfrtXv7pYf+iC1corPEY7607Icbs
rSOc5aFwnlUYpktoysV1G1crGYgYgXbXgVOUO9phHXJarpKf6SjVw3uXTLlmPUkC
AwEAAaMnMCUwEwYDVR0lBAwwCgYIKwYBBQUHAwEwDgYDVR0PBAcDBQCwAAAAMAkG
BSsOAwIdBQADgYEAmgyW60pT62JuM8GH+KogHW7viaMsifXitm3BC/GfaORpJCox
aS20fAlzGyAlDe9nZWN4roLSxQv0laJkxyNPDuHvLJt1l0FVdk6/vGB6QH0KqM+S
UaUTLsDZ99UNS/inotobxD9vXuKl58Uoe2lu7r9vJ+1DWDC6AyueSZ6xnno=
-----END CERTIFICATE-----
subject=/CN=demo.neosys.com
issuer=/CN=demo.neosys.com
---
No client certificate CA names sent
---
SSL handshake has read 635 bytes and written 411 bytes
---
New, TLSv1/SSLv3, Cipher is AES128-SHA
Server public key is 1024 bit
Secure Renegotiation IS supported
Compression: NONE
Expansion: NONE
SSL-Session:
    Protocol  : TLSv1
    Cipher    : AES128-SHA
    Session-ID: 8A0A00002D51DE183AC2845C6B3FF4BC7485181B4DCBC1758E3A2D5399BDD71C
    Session-ID-ctx:
    Master-Key: B10B9370E4DF70E873873AB9851B3CEF19623E6ADA697955E375D931DEE8301D798B4CB14C8D33FCF1BA066C0CC23897
    Key-Arg   : None
    PSK identity: None
    PSK identity hint: None
    SRP username: None
    Start Time: 1413885416
    Timeout   : 300 (sec)
    Verify return code: 21 (unable to verify the first certificate)
---
DONE
C. Check that you cannot CANNOT to https server using SSL3
openssl s_client -ssl3 -host $HOST -port $PORT
CAN CONNECT = VULNERABLE = NOT OK
If you get this then you need to configure the server to prevent SSL3
nagios@vm1m:~$ echo xxx|openssl s_client -ssl3 -host demo.neosys.com -port 4430
gethostbyname failure
connect:errno=0
nagios@vm1m:~$ echo xxx|openssl s_client -ssl3 -host demo.neosys.com -port 4430
CONNECTED(00000003)
depth=0 CN = demo.neosys.com
verify error:num=20:unable to get local issuer certificate
verify return:1
depth=0 CN = demo.neosys.com
verify error:num=21:unable to verify the first certificate
verify return:1
---
Certificate chain
 0 s:/CN=demo.neosys.com
   i:/CN=demo.neosys.com
---
Server certificate
-----BEGIN CERTIFICATE-----
MIIB3jCCAUugAwIBAgIQNj9FMjT1vIxGo2Mv2Ta9vzAJBgUrDgMCHQUAMB0xGzAZ
BgNVBAMTEmFkbGluZWQubmVvc3lzLmNvbTAeFw0wODAzMjUxMTIxMzFaFw0zNTA4
MTAxMTIxMzFaMB0xGzAZBgNVBAMTEmFkbGluZWQubmVvc3lzLmNvbTCBnzANBgkq
hkiG9w0BAQEFAAOBjQAwgYkCgYEArRuijA8jz3qBm2ZZEwITIJLWIMlQmZxcUvOo
HNZL0+3oJuX0AQqtpRZMp/7ob9agngfwJQ36vK+424zcBbmKxA2MweKZRalN2jz+
rdr1oeZ6/Ff3r8+rCPFj/B8CfMOQbSv6YcR0kVc+8ugybB7qT6Nq5ZWOAczG3Ikt
4EnOlqUCAwEAAaMnMCUwEwYDVR0lBAwwCgYIKwYBBQUHAwEwDgYDVR0PBAcDBQCw
AAAAMAkGBSsOAwIdBQADgYEAHIq5Gn2LiMgXFaUYrFEfHeajD4jAwdFw+zrjcBDZ
qM9LnhndHhdPogow9m9cCv1n57ne9rZL1v7w7Y6C53359hTUVZFqtHFfzcWnNyKD
uHD9a8QDk6/dSwBr/SWIE6OdFUYAj/kDXRQNB5H459spRVa3Yws8vpwrWZhoklxq
CQg=
-----END CERTIFICATE-----
subject=/CN=demo.neosys.com
issuer=/CN=demo.neosys.com
---
No client certificate CA names sent
---
SSL handshake has read 649 bytes and written 342 bytes
---
New, TLSv1/SSLv3, Cipher is RC4-MD5
Server public key is 1024 bit
Secure Renegotiation IS supported
Compression: NONE
Expansion: NONE
SSL-Session:
    Protocol  : SSLv3
    Cipher    : RC4-MD5
    Session-ID: 441A0000EBC1D634B2CDB12924F9B980D2A4CF8C4DD6D3FB9728D3C74F62A8FE
    Session-ID-ctx:
    Master-Key: 38F040BE3E7098857B7CB9FF3B44937786F8F8C002B0042370B29F20EFB582833F9E24CFC8E6560AFD06751DC93412D3
    Key-Arg   : None
    PSK identity: None
    PSK identity hint: None
    SRP username: None
    Start Time: 1413885545
    Timeout   : 7200 (sec)
    Verify return code: 21 (unable to verify the first certificate)
---
DONE
CANNOT CONNECT = NOT VULNERABLE = OK
nagios@vm1m:~$ echo|openssl s_client -ssl3 -host demo.neosys.com -port 443
CONNECTED(00000003)
write:errno=104
---
no peer certificate available
---
No client certificate CA names sent
---
SSL handshake has read 0 bytes and written 0 bytes
---
New, (NONE), Cipher is (NONE)
Secure Renegotiation IS NOT supported
Compression: NONE
Expansion: NONE
SSL-Session:
    Protocol  : SSLv3
    Cipher    : 0000
    Session-ID:
    Session-ID-ctx:
    Master-Key:
    Key-Arg   : None
    PSK identity: None
    PSK identity hint: None
    SRP username: None
    Start Time: 1413885702
    Timeout   : 7200 (sec)
    Verify return code: 0 (ok)
---
Enabling Internet Explorer 6 to access secured https web servers
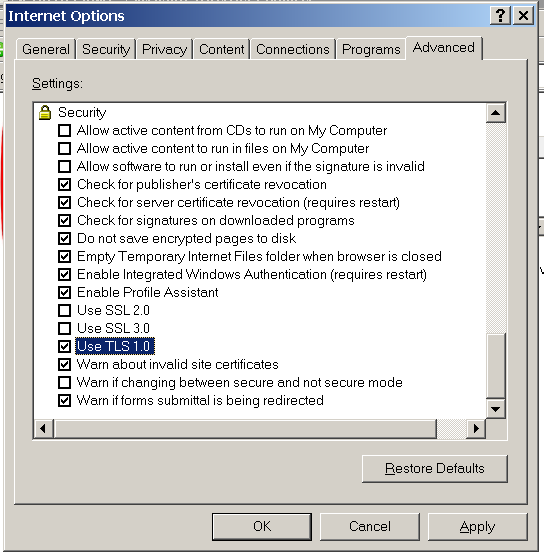
To use Internet explorer 6 (on win2003 and XP-before-SP3) to access secured http web sites you need to enable IE6 to use TLS 1.0. Internet Explorer 6 is present in Windows Server 2003 and Windows XP-pre-SP3.
You can also disable SSL 2.0 and SSL 3.0 for additional safety. This good for later versions of Internet Explorer too.
Generating IIS certificates for https using openssl
This covers the two main type of certificates:
- "proper" certificates (accepted by all browsers without complaint) - issued by bona fide certification authority only on proof of control of a domain name - usually for a small fee
- "self signed" certificates (not accepted by all browsers without error messages without special configuration) - easily
issued by anybody without the slightest restriction
NEOSYS' proper https certificate for *.hosts.neosys.com, valid approx Jan-Dec 2016, issued by Comodo, was purchased from namecheap.com for a small fraction of the price of purchasing from Comodo or one of the other main certification authorities.
There is no technical requirement to renew certificates with the same issuing authority, nor is their any restriction whatsoever from having multiple concurrent overlapping certificates, in any combination, for the the same domain name or subsets of a domain name. For a certificate to be "proper" it merely has to be issued by (not necessarily purchased from) one of the certificate authorities registered in all the main browsers using by NEOSYS clients. Unlike DNS domain name registrars, of which you can only have one at any one time, and which take to change, certificates are simply installed in particular servers without reference to each other, nor to any imaginary central internet registry, as IS the case for the DNS domain name registry.
The sales of certificates is a bit of scam really because anybody can get a certificate from the main commercial certificate authorities merely by proving control over a domain name - for example, by receiving an email to ADMIN@xxxxx.com. Except for EV certificates such as those issued to banks etc, most https certificates are issued without any check on physical identity or reputation, therefore the cost of issuing https certificates rests merely on the fact that the certification authority has managed to inveigle itself into all the main browsers and have their public key installed along with the browser software. Hoowever, the market seems to be collapsing, with even free certificate authorities appearing although with some minor limitations like short duration of validity of certificates.
Excellent summary of using openssl to manage certificates .. no Alternate Names though https://www.digitalocean.com/community/tutorials/openssl-essentials-working-with-ssl-certificates-private-keys-and-csrs
Excellent summary of selfsigned and properly signed certificate https://httpd.apache.org/docs/2.4/ssl/ssl_faq.html
Commentary on https security
With the general move to using https instead of http after the Snowdon revelations, people have begun to better understand how https certificates really work. People are more aware now that most https certificates mean little more than that their communication with the server is a) confidential b) not tampered with c) is truly with the server/domain name apparent and not some other. ALL WITH THE EXCEPTION OF *ANYBODY* WHO IS A CERTIFICATE AUTHORITY REGISTERED IN THE MAIN BROWSERS - WHICH IS MANY - INCLUDING NON-FRIENDLY NATIONAL STATE ACTORS!
It is possible however to be virtually certain of confidentiality and accuracy of your communication using standard browsers, EVEN VERSUS CERTIFICATION AUTHORITIES. If, by inspecting the certificate when you are browsing a particular web site, you can satisfy yourself that it is in fact truly the one in use by the web server, the chances of your communication being secure is virtually 100% The only chance is some failure in fundamental encryption protocols. Such failures would either be public knowledge very quickly, or not used versus you, for fear of it becoming public knowledge, unless you really have something incredibly valuable to hide. In this sense, self-certified certificates are the most secure, since you can obtain them by some other secure channel directly from the web server operator and do not change without your action. Note that in order to ensure that a certificate does not change during your session, to say an unknown valid certificate that breaks your security, your browser must support certificate pinning, in which case the browser will either prevent, or inform you if the certificate for the web site changes, either between or within sessions.
To gain a practical understanding of the issues raised if you trust the certification authorities built in to your browser, consider the fact that many companies require an additional certificate authority to be installed in all corporate browsers (and in some famous cases have installed it covertly), and thereafter all https communications are decrypted in the company firewall/proxy using the corporate certificate, checked for content and reencrypted with the true certificate before being passed on - or vice versa, depending on the direction of flow of information. This, for example means that an employee accessing their bank account would be completely exposed to the corporate gaze. Two factor security would prevent corporate interference in say, instructions to make payments, but all information would be exposed and probably logged in possibly long term records. The same would apply to all https web sites accessed by the employee. Courts seem to agree that corporations have every right to do this but the average person is commonly not aware of it. If a person understood how https security works, they could inspect the https certificate to make sure it is the correct (same one issued by their bank apparent at home for example), since it is unlikely that an adversary (or in this case their employer) would control their actual browser software, but security is an arms race and once everybody knows how to defend themselves, adversaries and security operators will simply move to the next level. The next level may be preventing users from using their own browsers. This is already the case in most secure environment, but not all, and BYOD attitudes may prevail in the long run. Whatever the issues are in this case, the same general principle apply in other situations involving security.
Generating a self signed certificate in pfx form for IIS
Generating certificates and keys https://httpd.apache.org/docs/2.4/ssl/ssl_faq.html
Generating a pfx using openssl https://langui.sh/2009/01/24/generating-a-pkcs12-pfx-via-openssl/
Generate standard cert and key pair
First generate a matching pair of certificate and key files (x509 and rsa format respectively)
Example for *.mydomain and validity 9999 days from now
signer=self
mydomain=neosys.com
mydomains=*.neosys.com
expirydays=9999
keyno=`date`
certno=$keyno
#
certfilename=$mydomain-$signer-$certno.cer
keyfilename=$mydomain-$keyno.key
#"-nodes" means -no-DES ie no encryption ie generate a key file without encrypting it and therefore without requiring a password on it
openssl req -new -x509 -nodes -days $expirydays -out "$certfilename" -keyout "$keyfilename" \
    -subj "/C=AE/ST=DUBAI/O=NEOSYS/CN=*.neosys.com" \
    -reqexts SAN     -config <(cat /etc/ssl/openssl.cnf \
     <(printf "[SAN]\nsubjectAltName=DNS:*.hosts.neosys.com,DNS:*.support.neosys.com")) \
Consider adding subject and subject alternative names
openssl x509 -req -new -sha256 \
    -newkey rsa:2048 \
    -keyout neosys.com-102.key \
    -subj "/C=AE/ST=DUBAI/O=NEOSYS/CN=*.neosys.com" \
    -reqexts SAN     -config <(cat /etc/ssl/openssl.cnf \
     <(printf "[SAN]\nsubjectAltName=DNS:*.hosts.neosys.com,DNS:*.support.neosys.com")) \
    -out neosys.com-102.crt \
    -nodes \
    -days 9999
Example session:
Country Name (2 letter code) [AU]:AE
State or Province Name (full name) [Some-State]:DUBAI
Locality Name (eg, city) []:DUBAI
Organization Name (eg, company) [Internet Widgits Pty Ltd]:NEOSYS
Organizational Unit Name (eg, section) []:IT
Common Name (e.g. server FQDN or YOUR name) []:*.neosys.com
Email Address []:it@neosys.com
Generating a properly signed certificate
http://wiki.gandi.net/en/ssl/csr#sha-2_certificate_request
Generate key and CSR file
A certificate signing request file (.csr) for *.hosts.neosys.com (wildcard certificate)
if you are renewing (and want to reuse an existing secret server key file mydomain.key, although not clear on the benefit ATM)
openssl req -new -nodes -sha256 -key mydomain.key -subj "/C=AE/ST=DUBAI/O=NEOSYS/CN=*.hosts.neosys.com" -out mydomain.csr
or if you want to generate a new secret server key file
openssl req -new -nodes -sha256 -newkey rsa:2048 -keyout mydomain.key -subj "/C=AE/ST=DUBAI/O=NEOSYS/CN=*.hosts.neosys.com" -out mydomain.csr
or if you want to request SAN subdomain wildcards (unlikely to be granted by main cert authorities but perfectly legal and can be self certified)
openssl req -new -nodes -sha256 -newkey rsa:2048 -keyout mydomain.key -subj "/C=AE/ST=DUBAI/O=NEOSYS/CN=*.neosys.com" -out mydomain.csr \
    -reqexts SAN     -config <(cat /etc/ssl/openssl.cnf \
       <(printf "[SAN]\nsubjectAltName=DNS:neosys.com,DNS:*.neosys.com,DNS:*.support.neosys.com,DNS:*.hosts.neosys.com"))
View the csr and verify correct (check that SAN additional domains are listed if you requested them above)
openssl req -in mydomain.csr -noout -text
Either send to CA and get crt/cer file back
Send the csr file to the certifying authority and put their response in a mydomain.crt file
Make sure you inform them that the type of software you used to generate the csr is "mod Apache/ModSSL"
mydomain.csr -> mydomain.cer
Or self sign to test all ok
nano ssl.conf
[req_distinguished_name]
countryName = Country Name (2 letter code)
countryName_default = AE
stateOrProvinceName = State or Province Name (full name)
stateOrProvinceName_default = Dubai
localityName = Locality Name (eg, city)
localityName_default = Dubai
organizationalUnitName  = Organizational Unit Name (eg, section)
organizationalUnitName_default  = IT
commonName = *.neosys.com
commonName_max  = 64
#
[ v3_req ]
# Extensions to add to a certificate request
basicConstraints = CA:FALSE
#keyUsage = nonRepudiation, digitalSignature, keyEncipherment
subjectAltName = @alt_names
#
[alt_names]
DNS.1 = neosys.com
DNS.2 = *.neosys.com
DNS.3 = *.hosts.neosys.com
DNS.4 = *.support.neosys.com
openssl x509 -signkey mydomain.key -in mydomain.csr -req -days 9999 -extensions v3_req -extfile ssl.conf -out mydomain.crt
view the cert and check extensions (additional domain names) are present if required
openssl x509 -in mydomain.crt -text -noout
Merge private key and signed public cert into password protected pfx file
Convert the pair of standard files into a single pfx file that IIS can import
friendlyname="COMODO SIGNED hosts.neosys.com *.hosts.neosys.com"
openssl pkcs12 -export -in mydomain.crt -inkey mydomain.key -name "$friendlyname" -out mydomain.pfx
It will ask for a password .. the usual NEOSYS one is 1f... which will be required when you import the pfx file into IIS before binding to web sites
Example session:
Enter Export Password:
Verifying - Enter Export Password:
Check the pfx file
openssl pkcs12 -in mydomain.pfx
openssl pkcs12 -in mydomain.pfx | openssl x509 -noout -text
Copy the pfx file to the IIS server and import/bind in the usual way
Copy it to the https server
mysshport="-P 19510"
mysshtarget="administrator@win3.neosys.com:/cygdrive/d/hosts/CERTIFICATES"
scp $mysshport mydomain.pfx $mysshtarget
Friendly name in pfx file
On the IIS server after importing, if you have multiple certificates for the same domain name you might like to add a "friendly name" to distinguish them in the dropdown when binding certificates to web sites.
You might also want to add the friendly name to the pfx file if you intend to import it again or elsewhere using certificate export to pfx with options Include All and Export All
https://rickardrobin.wordpress.com/2012/12/05/specifying-a-friendly-name-to-a-certificate/
Understanding SSL certificates
What are RSA Private Keys, CSRs and Certificates?
YOUR RSA PRIVATE KEY FILE
is a digital file created by you and never ever shared with others. It is USED ONLY BY YOU (never by others) to either:
- to DECRYPT secret, encrypted, messages received by you from others
- to SIGN messages before sending them to others providing them certainty that the message came from you without being tampered with and that you cannot deny signing them.
YOUR RSA PUBLIC KEY FILE
is a digital file created by you and freely shared with others. It is USED BY OTHERS (never by you) to either:
- ENCRYPT messages before sending them to you
- VERIFY that signed messages were in fact signed by you and not tampered with and you cannot deny signing them.
OTHER PERSON'S RSA PUBLIC KEY FILE
is a digital file created by the other person and freely shared with you and others. It is USED BY YOU OR ANYBODY (never by the other person) to either:
- ENCRYPT messages to achieve secrecy before sending them to the other person.
- VERIFY that signed messages received were in fact signed by the other person and that they cannot deny signing them nor claim they have been tampered with.
To obtain someone's public key, you need a trusted channel, ie a signed channel, but not a secret or encrypted channel since the information is public and not confidential.
Using your private key and someones public key together:
- If you want to send a signed secret message to someone and allow them to be sure it came unmodified from you, you first sign the message using YOUR PRIVATE KEY, then encrypt the message using THEIR PUBLIC KEY
- If you want to receive a secret message and verify that it came unmodified from someone in particular, you first you decrypt the message using YOUR PRIVATE KEY, then verify the message using THEIR PUBLIC KEY
Signing and Verification = Encryption and Decryption Mathematical Process with keys reversed
Actually, the process of "signing" is doing the same mathematical process as encryption, but since you use the recipients public key, the resultant "encrypted" messege is not secret because it can be "decrypted" using a public key which are freely available.
Likewise, the process of "verification" on a received message is doing the same mathematical process as decryption, but since you are using the senders public key, and anybody could "decrypt" the message, it was not really encrypted in the sense of being secret.
So we have two processes, one called Encryption/Signing but is exactly the same mathematical process with two names depending on whether we use a public or private key, and another process called Decryption/Verification which uses the opposite key.
What YOU use for what:
- YOUR (PRIVATE) KEY = USED BY YOU for decryption and signing
- THEIR (PUBLIC) KEY = USED BY YOU for encryption and verification
- YOUR (PUBLIC) KEY = NEVER USED BY YOU - since anybody else could do the same thing so no trust or secrecy could be obtained
- THEIR (PRIVATE) KEY = NEVER USED BY YOU - since you dont have it!
What to use:
- ENCRYPT OUTGOING = Use THEIR (public) key
- VERIFY INCOMING = Use THEIR (public) key
- DECRYPT INCOMING = Use YOUR (private) key
- SIGN OUTGOING = Use YOUR (private) key
So the slightly strange thing is that you dont encrypt messages with your private key as might be assumed naturally. You encrypt using the target recipient's public key. This is perfectly logical if you understand the concept asymmetric cryptography.
One thing to note is that, while it is obvious that other people never use your private key, since they dont have it, it is not obvious, but perfectly true, that you never use your public key. NOBODY EVER USES THEIR OWN PUBLIC KEY ... THEY ONLY GIVE IT TO OTHERS TO USE.
CERTIFICATE
It has a public component which you distribute (via your Certificate file) which allows people to encrypt those messages to you. It can also be used by you to sign messages that can be verified as having come from you by anyone who receives the signed message, using your public key.
CSR FILE
A Certificate Signing Request (CSR) is a digital file which contains your public key and your details eg name/domain name etc. You send the CSR to a Certifying Authority (CA), who will create a real Certificate containing your detail eg your domain name and your public key, signed by them using their private RSA private key.
CERTIFICATE
A Certificate contains your RSA public key, your name, the name of the CA, and is digitally signed by the CA. Browsers that know the CA can verify the signature on that Certificate, thereby obtaining your RSA public key. That enables them to send messages which only you can decrypt.
What is Asymmetric cryptography?
Asymmetric cryptography allows you to freely publish a "public" key that can be used by anyone to send you encrypted messages. Such messages can only be decrypted by you using a special matching "private" key which you always keep secret.
Asymmetric cryptography also allows you to publish "signed" messages that can be verified by anyone as coming directly from you without any modification by others. Such messages are created using your "private" key and can be verified by anyone who has your "public" key. Creation involves the same process as encryption. Verification uses the same process as decryption.
Note that you dont ever actually use your own public key. You use your private key to decrypt messages sent to you, and you use the same key to "sign" messages to prove they came from you and without modification. Likewise other people only ever use your "public" key - either for encrypting messages that they want to send to you, or verifying that signed messages did come from you unmodified.
So we have a pair of keys that if either one is used for encryption/signing, then the other one is required for decryption/verifying. In that sense, it does not matter which we choose to keep private and which public, but ensure that we only ever publish one of them and forever keep the other secret.
So, to start encrypting or signing, you need a matched pair of keys, and you need to publish one to other people and forever keep the other one secret.
.key a file that contains a random collection of characters that can be used to encrypt
.cer a file that contains a random collection of characters that can be given out publicly and used by anybody to encrypt something to be sent to you
A certificate is some information that has been processed by a private and secret key.
pfx contains a private key and public certificate which contains your public key embedded. Usually pfx files are encrypted and you have to enter a password before using them, ie importing them.
Backing up and Restoring IIS configuration
Solving IIS errors
Solving error during file upload: "Page cannot be displayed" HTTP Error 405 in windows 2003
This error should not occur in normal NEOSYS installations but the solution is as follows:
- Go to Control Panel, Administrative Tools, Internet Information Services
- Expand the tree to COMPUTERNAME, Web Sites
- Right-click "Default Web Site" (or specific Web Site if multiple NEOSYS http/https installations on the server as per WIN3)
- Properties
- Home Directory
- Configuration
- Mappings, Add
- Browse
- Dynamic Link Libraries *.dll" from the "Files of Type" dropdown
- Find and select D:\NEOSYS\neosys.net\NEOSYS\dll\upload.dll (OR upload.dll in the installation directory)
- Extension Type: dll
- Limit to: All
- Click the "OK" button
Solving error during file upload: "HTTP verb used to access this page is not allowed" HTTP Error 405 in windows 2008
Cause: This error occurs when upload.dll is not set up on IIS
Solution: Ensure upload.dll is setup as per configuration: Setting up upload.dll
Look in event log for errors saying various dlls have failed to load eg
The Module DLL C:\Windows\System32\inetsrv\authsspi.dll failed to load. The data is the error.
These errors indicate that IIS is configured to use various modules that have not been installed, possibly due to restoration of IIS configuration backups which mention them but the restore program restores the configuration but does not install the dll. They may not even be required, but how to exclude them is not solved in this article.
Solution is to install the various required modules by right clicking IIS role and choosing Add Role Service
- inetsrv\filter.dll - ISAPI Filters
- validcfg.dll - .NET Extensibility?
- iis_ssi.dll - Server Side Includes
- authsspi.dll - Windows Authentication
A list of module names mapped to dll files can be found in the IIS configuration file. This may give a clue what module is required to be added in Programs and Features or Roles. Alternatively, the module may no longer be required on a new server and can be deleted from the configuration file (take a backup. this may could cause other strange errors, perhaps much later on) and IIS restarted with the new configuration.
cd C:\Windows\System32\inetsrv\config
notepad applicationHost.config
Example from neosys win3:
        <globalModules>
            <add name="UriCacheModule" image="%windir%\System32\inetsrv\cachuri.dll" />
            <add name="FileCacheModule" image="%windir%\System32\inetsrv\cachfile.dll" />
            <add name="TokenCacheModule" image="%windir%\System32\inetsrv\cachtokn.dll" />
            <add name="HttpCacheModule" image="%windir%\System32\inetsrv\cachhttp.dll" />
            <add name="StaticCompressionModule" image="%windir%\System32\inetsrv\compstat.dll" />
            <add name="DefaultDocumentModule" image="%windir%\System32\inetsrv\defdoc.dll" />
            <add name="DirectoryListingModule" image="%windir%\System32\inetsrv\dirlist.dll" />
            <add name="ProtocolSupportModule" image="%windir%\System32\inetsrv\protsup.dll" />
            <add name="StaticFileModule" image="%windir%\System32\inetsrv\static.dll" />
            <add name="AnonymousAuthenticationModule" image="%windir%\System32\inetsrv\authanon.dll" />
            <add name="RequestFilteringModule" image="%windir%\System32\inetsrv\modrqflt.dll" />
            <add name="CustomErrorModule" image="%windir%\System32\inetsrv\custerr.dll" />
            <add name="HttpLoggingModule" image="%windir%\System32\inetsrv\loghttp.dll" />
            <add name="RequestMonitorModule" image="%windir%\System32\inetsrv\iisreqs.dll" />
            <add name="IsapiModule" image="%windir%\System32\inetsrv\isapi.dll" />
            <add name="IsapiFilterModule" image="%windir%\System32\inetsrv\filter.dll" />
            <add name="ConfigurationValidationModule" image="%windir%\System32\inetsrv\validcfg.dll" />
            <add name="ManagedEngine" image="%windir%\Microsoft.NET\Framework\v2.0.50727\webengine.dll" preCondition="integratedMode,runtimeVersionv2.0,bitness32" />
            <add name="ServerSideIncludeModule" image="%windir%\System32\inetsrv\iis_ssi.dll" />
            <add name="WindowsAuthenticationModule" image="%windir%\System32\inetsrv\authsspi.dll" />
            <add name="ManagedEngineV4.0_32bit" image="c:\Windows\Microsoft.NET\Framework\v4.0.30319\webengine4.dll" preCondition="integratedMode,runtimeVersionv4.0,bitness32" />
            <add name="ManagedEngineV4.0_64bit" image="c:\Windows\Microsoft.NET\Framework64\v4.0.30319\webengine4.dll" preCondition="integratedMode,runtimeVersionv4.0,bitness64" />
        </globalModules>
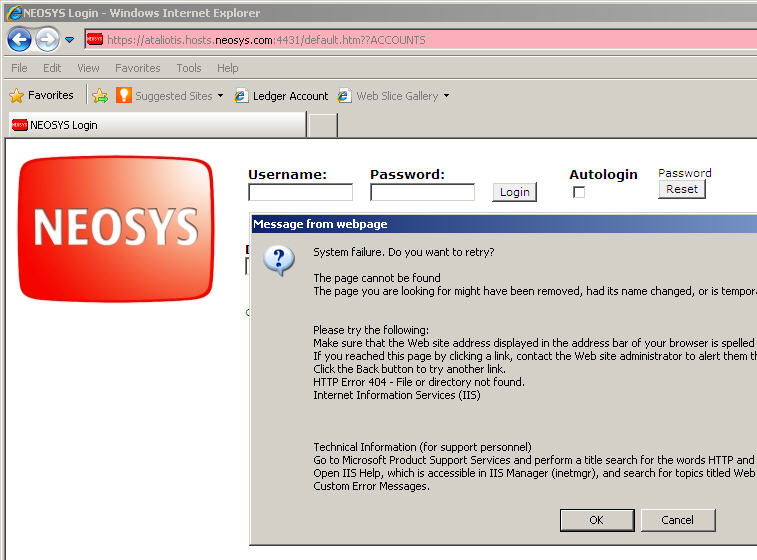
Solving HTTP Error 404 Error occurring immediately on opening NEOSYS login page on a new server installation: "System Failure. Do you want to retry?"
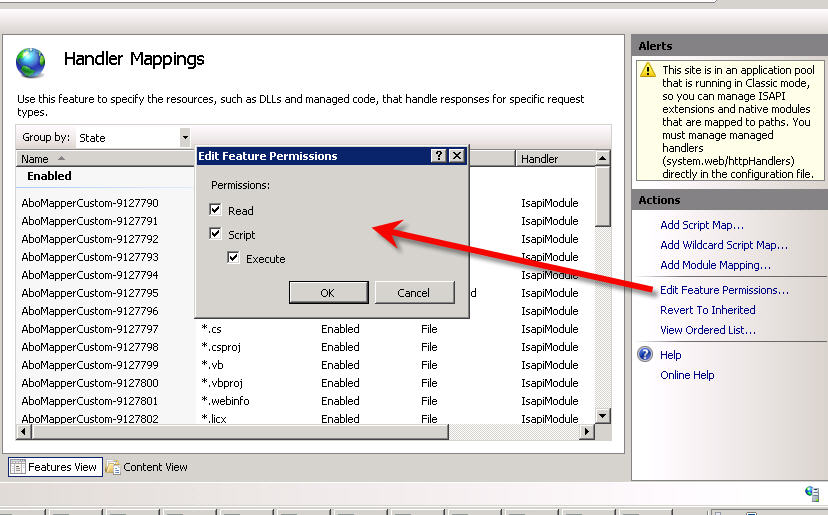
This error message is caused by failing to enable Active Server Pages in the IIS configuration. To resolve this in windows 2008, ensure that Read, Script, Execute is ticked (enabled) in the feature permissions of these Handler Mappings.
This message is from IE8 and a Windows 2003 server. The message may be different for other browser versions.
Message from web page.

System Failure. Do you want to retry?

The page cannot be found
The page you are looking for might have been removed, had its name change, or it temporarily unavailable.

Please try the following:
(omitted)
HTTP Error 404 - File or directory not found.
Internet Information Services (IIS)
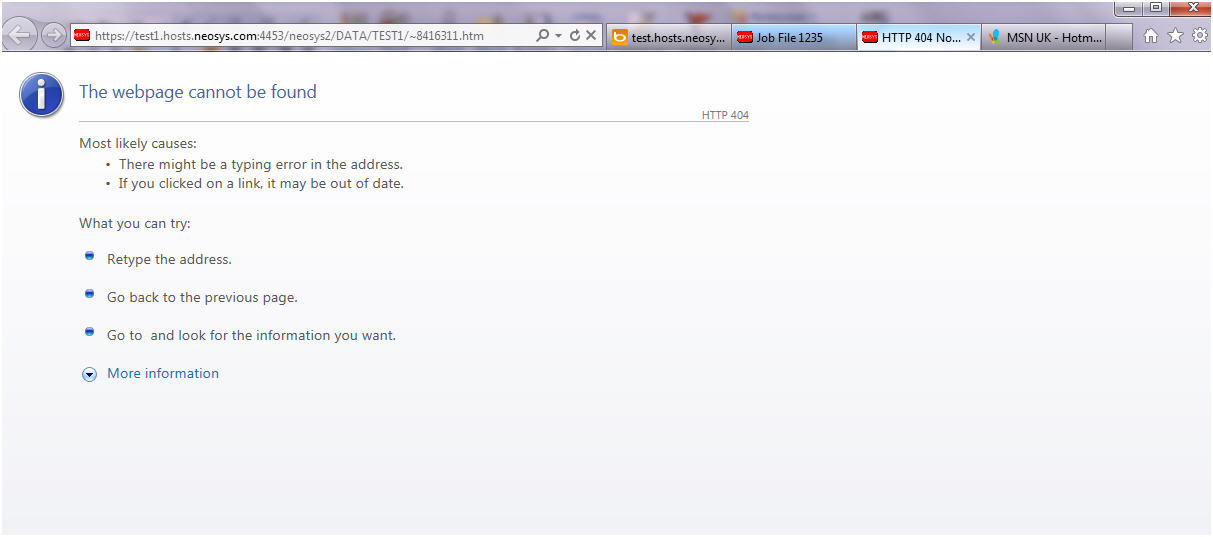
Solving HTTP 404 Webpage cannot be found
This error message clearly states that the page cannot be found. Check for the requested page in the client website folder under the virtual directory data. This page will be available under the data folder in D:\neosys\data. A possible cause of this error is by failing to create a virtual directory called data linked to D:\neosys\data:
Problem:
Browser shows "Service unavailable" when trying to access NEOSYS
Check if IIS application pool is disabled. IIS application pool gets automatically disabled after a series of worker process failures.
Open system logs and check for W3SVC error with event ID 1002 to confirm that the application pool was disabled automatically due to a series of failures in the process(es) serving that application pool.
Solution:
Open IIS, expand application pools, right-click the application pool that was automatically disabled, and click Start. Browse to NEOSYS website to check if the problem is fixed.
Additional Information:
To view the settings for the number of process failures after which the application pool gets disabled, go to IIS, expand application pools, right-click the application pool, click "Set Application Pool Defaults" (for Windows Server 2003, right-click the application pool, click properties and then go to the "Health" tab).
"Rapid-Fail Protection" is the feature that disables the application if there are a certain number of worker process failures within a specified time period.
As per the configuration shown in the example screenshot below, application pool "DefaultAppPool" will be automatically disabled if 5 or more worker process failures happen within a time period of 5 minutes.
Solving Error "The specified Executable does not exist on the server"
While adding Script Map in Handler Mappings in the above step, if you get the below error, this means you have not yet run the Maintenance window/ NEOSYS processes and skipped steps in Installing NEOSYS. File upload.dl_ is installed from NEOSYS.EXE or NEOSYS2.EXE and converted to .dll the first time you run NEOSYS Maintenance/Process. You can also manually rename the file to upload.dll.
Solving IIS error 500 on uploading for windows 2008
To test if permissions are the problem, in grant full control to IUSR over the whole client directory e.g d:\neosys or d:\hosts\clientx in security tab of windows explorer and see if you can upload.
Regardless of the result, remove the full control permissions since they are a security risk.
If permissions are the problem then grant specific permissions as follows:
- images folder - read and write permissions (but not execute)
- dll folder - read and execute permission (no write permission)
Solving error "Upload folder cannot be created.The system cannot find the drive specified"
This error message comes up when the file uploads are configured to a different location in the software than what is set up in IIS.
There is an internal system configuration in line 49 of the DOS SYSTEM.CFG file which mentions the upload folder location (normally blank which means xxxxxx\images\ where xxxxxx is the installation directory e.g d:\neosys)
In installations where the images are uploaded to a place other than the installation directory, the configuration may say something like h:\images\ where h represents the drive where the folder is located e.g on an external USB drive. This may be done in case of client installations where file uploads are configured on USB drives due to a huge number of files getting uploaded.
The IIS and internal system configuration must agree, otherwise users will probably not be able to upload files, or the uploaded files may not be saved in the right place and may be lost, not backed up and/or not viewable.
To fix this issue, you MUST link the images folder in IIS to xxxxxx\images\ where xxxxxx is the directory of the images folder as shown in the error message.


